New battery for the Radon Swoop

So, after having used the current 20s5p molicel pack for a couple of years it decided to give up during a ride in the snow a few weeks ago. It suddenly lost voltage and would not recharge and when I took it apart two cell groups were sitting at 0V. As I had taken a shortcut bypassing the 60A chinesium BMS to get the power output I wanted from the battery I guess this was bound to happen. The BMS at least prevented me from charging the battery when any cell group were at a bad voltage, so that’s good.

I took the pack apart and put all the 18650s through a thorough testing program and capacity measurement. All cells in the 18 cell groups that were at an OK voltage were good but the cells in the bad groups were at very low capacities if they took charge at all.

Before this ride I’ve had the bike sitting untouched for several months so I guess it’s gotten slowly discharged during this time and when I took it out for a ride pulling 100-ish amps from cells already low at charge it eventually killed them. (This is just me guessing at what happened).

As the battery box I was using was a bit cumbersome to build and mount due to me trying to make a quick-change battery at the time I decided to design a new pack from scratch.

Fitting 100 cells in the swoop frame is tight fit, so I had to make some prototypes before finding the best shape to get an as-decent-as-possible battery layout that’d actually fit (and be able to mount) in the frame. To make it as sturdy as possible I could not fit the side covers before putting the pack in the frame so it’s tight.. 🙂

Since I’ve upgraded to the BAC2000, pulling A LOT more current from the battery (this might also be part of the reason for the failure of the old pack) I built the new pack as a copper/nickel sandwich that should be capable of providing all the amps I need. To save some money I only replaced the bad cells with cells I already had at home. Doing this it’s important to make sure the “old” cells aren’t mixed with new cells as the drain profiles might differ causing individual 18650s to see more load than the average cell which could lead to failure.
To give the pack the best chance to survive I installed an ANT BMS capable of 120A cont and 300A peak. This allowed me to route the power through the BMS even for the consumer and letting the BMS kill the power to the bike if any cell group goes low. The BMS can be monitored via bluetooth so I can keep track of the health of the battery too which is a nice feature to have.
The pack looks nice and being a fair bit wider than the old pack doesn’t matter. As it sits it’s not in the way of anything when riding. The pack gives a good punch when slamming the throttle and the bike wants to lift the front wheel all the time which is awesome.

Hopefully this pack’ll last a couple of more years before needing a rebuild again.

Summer, injuries and battery build

So, early this summer season I did something really stupid. I replaced the brake pads on my ebike and took it out for a test.. Riding 50m on the street outside our house being a little bit too tired. The bike was in second gear, I thought it was in third so when I pushed the throttle it wheelied.. a little too much.. Tired as I was I slammed the brakes.. both of them.. so when the front wheel hit the ground it was locked sending me over the bars. Never let go so when the neighbor found me in the ditch I had scratches on the outsides of my hands, my elbow was bleeding badly and I had hit my head pretty bad which knocked me out for a bit. Since I was just going to test the brakes I was not wearing a helmet.. :/
When I regained consciousness I was pretty out of it and after talking to my brother a bit asking the same question over and over he sent me off to the ER. A few stitches, a couple of shots and a complete brain scan later I got to go home with orders to REST.. which of course I did not.

My daughter turned 15 this summer and she got an electric moped for her birthday. Since the bike can fit two batteries I of course had to build one from cells I’ve reclaimed from old scrap ebike batteries..

These are Samsung 30T 3000mAh 21700 cells, good for 35A a piece.

Since the moped and charger says 60V I built this 16s10p pack which would fit the battery compartment in the moped easily.. but then I checked the voltage of the charger and realized it’s a 17s system.. :/ So, I had to put an extra 10s cell on top of the pack making the fit pretty tight, but it still works.

I’ve made the pack in such a way that there’s a SuperSoco connector connected to the 60A BMS and I’ve got 2 XT90 connectors that bypasses the BMS so that I can use the same pack on my future LightningRods BB builds..

The problem is that the SuperSoco uses a serial connection to talk to the battery to display the correct charge state and such which makes this pack show 5% charge even when fully charged.. I’ve ordered a connector that should solve that problem, still waiting to test it.

So.. since I didn’t rest enough after the head injury it kind of never got better. I’ve now been diagnosed with ‘fatigue’, when the brain kind of gets overloaded way too easily. This can happen after a serious head trauma I’ve been told, so I need to let the brain rest A LOT for some time to come. This totally sucks. I have not been able to ride my bike this summer as my brain has not been able to keep up with offroad riding..

In order to be able to get some 2-wheel action me and my wife got one of these each.. not as quick or agile as the Swoop, but it’s super cozy and quite fun to glide around on!

So, it’s been quite a boring summer due to me not wearing a helmet and having a bit of bad luck.. So, if you’re reading this – take it from me.. wearing a helmet when riding is a super good idea, like EVERY time!

Keep safe – have fun. I’ll soon have more fun projects to share!

Floating battery

Since the only one in the family who didn’t have an electric bike was my wife I of course had to build one for her as well. When asking what the battery should look like the answer was “It should look like it’s kind of floating in the frame”.. Well..

I had to use the mill for this one, milling 10mm acrylic spacers to hold the edges of the battery pack. Since my beloved wife doesn’t do much offroad racing this’ll be plenty strong enough.

Designed a box shape that follows the frame with an offset. This is a test fit of the outer casing, seems quite ok.

So, after welding a 13s5p pack of LG MJ1 cells the bike turned out quite ok.

The bike is propelled by a BBS02 motor using an eggrider display and performs real good. This motor previously had a problem with the controller where it would say the battery was depleted when it was almost full, but with the eggrider this seems to work just fine.

Trollface box

So, after having posted on social media about the boxes I built a finnish friend reached out to me asking for help in printing a box. He already had a design and proper 21700 batteries so I just threw something together in CAD and printed it out for him.

When I asked him for a logo to use he sent me a picture. I don’t know if he was serious or not but this is how it turned out:

He was happy with the result and the fit in the frame was more or less perfect.

Didn’t get many more pics of this project unfortunately, so this was just a quick update.. there’s still much more to come so stay tuned!

Mondraker battery build

So, a buddy from Italy reached out to me. He had seen what I’d built for myself and my family and had a super nice Mondraker frame for which he could not get a suitable battery case. Since it’s almost impossible to ship batteries abroad I offered to make him a case for him to weld his own pack in.

Same method as before but he wanted to fill the entire frame “triangle” on the bike with the pack, so we made quite the large compartment for the BMS and wiring. This was also done to minimize the total width of the pack and centering it on the frame.

Here you see all the components. The cell frame, the joiner, the sides of the box and the TPU gaskets to make it waterproof(er).

Since my buddy didn’t want visible zipties to mount the pack to the frame we devised a mounting system using CNC milled aluminium brackets to mount to the bottle holder holes and two additional holes he would make.

The brackets are made to make the plastic case survive the forces from the M5 screws holding it to the frame.

Perfect fit. The bit wierd method of having theese brackets under the box is so we could use the cellframe/joiner method to make it. The brackets are mounted on the frame and the box slid over them before putting the final side on the box. That way the box can be removed without tearing up the cell welds. 😉

To be able to make the logo more visible I printed white infills.

This box is now in place in Italy enjoying the sun and I got a picture of it all mounted.

Beautiful bike and the battery fits perfect in the frame!
This was quite an interesting build. The design my pal had already done and he had quite specific requirements for the mounting system and how he wanted it all to look. Turns out he knew what would look awesome in that frame!

Battery for my sons bike, 2 generations

So, of course when I ride an awesome ebike the kids want one too. First of all I had to build one for my wife but that’s just a standard bike with a hailong pack. This is what I was riding at the moment:

Generation 1, 2020

But since my son was a wee bit short (10 years old) the bike we got for him could not fit any standard battery, so this was actually the very first totally custom battery I built.

Started out by making a dummy frame just to see how many cells we could fit in his frame and to get an idea of the shape of it:

Made cell frames and fit K-power 2500mAh 12,5A cells in there.

Installed the second frame and welded it all together.

As you can see this is a 13s5p pack yielding a whopping 48V with 12,5Ah and a total power output of 62,5A. This is by far enough for a small 10yo child. Only once did he ever run out of juice with this battery and that was after a 40km+ ride starting out with a half full pack.

Kapton tape to insulate the pack and then it was just a matter of mounting the BMS and putting it all on the bike.

Printed the case on glass, that’s why the sides of the box is so reflective. That didn’t last for long with the abuse the kid put this bike through though. 😉

Generation 2, 2021

Skip forward one year. A couple of crashes later he has grown quite a bit taller and now enjoys following me on the harder offroad and downhill trails. Never complaining I can see how he suffers from the stiff rear end of the green Merida bike and having bent both the rear rim and the front fork quite badly I thought it was time for an upgrade.

I found a used Giant Glory 8 in small size for cheap, just some 350km away, so I made a roadtrip and picked it up. This frame looked like a perfect fit for an electrical conversion!

After some careful measuring (and a lot of not so careful grinding on the frame to fit the BBS02 motor) the normal process started.

Cell frame with cells. This was actually the first time I tried the frame-joiner-frame pack type due to a total lack of space in the frame. This time we wanted more speed so we decided to go with a 14s4p pack to get a 52v battery. The problem using only 4 cells is the low capacity of the pack so this time we built it on LG MJ1 cells with a 3500mAh capacity and 10A continuous power output yielding a 52v pack with 14Ah capacity capable of 40A output. This is more than enough for the BBS02 and even after upgrading to the BBSHD (after messing up a controller) the battery doesn’t even sweat power wise.

The joiner is installed over the frame with cells. Take note on the cell configuration. I’m trying, even though it’s sometimes hard, to get as good a serial connection as possible throughout the entire pack. For a 40A pack like this I want to get at least 4 or 5 serial connections with my 0.2 x 8mm nickel strips which means I often have to put several layers of nickel on top of eachother.

Other side cell frame put in place. It’s such a tight fit that I sometimes have to put the pack on the floor and use my weight to evenly push the frame onto the cells.
Welding and adding insulating kapton tape on the side of the battery before turining it around to weld the other side. I take real good care not to accidentally short the pack out. Shorting it out is REAL unpleasant and bad for the cells too..

After insulating the pack more with tape which I like to put between the cells and any leads running over it, I add the BMS to the side of the pack and then close it all up.

He did not want any logo on the side of the battery so this is how it turned out. Works flawlessly but 14Ah is a bit on the low side with the type of riding we do now so for next summer we’ll revisit this bike and somehow fit an even larger pack on there.

Specialized and mongoose battery builds

So, a couple of friends wanted to build ebikes of their own and of course they needed custom batteries to fit their frames.

Specialized – something

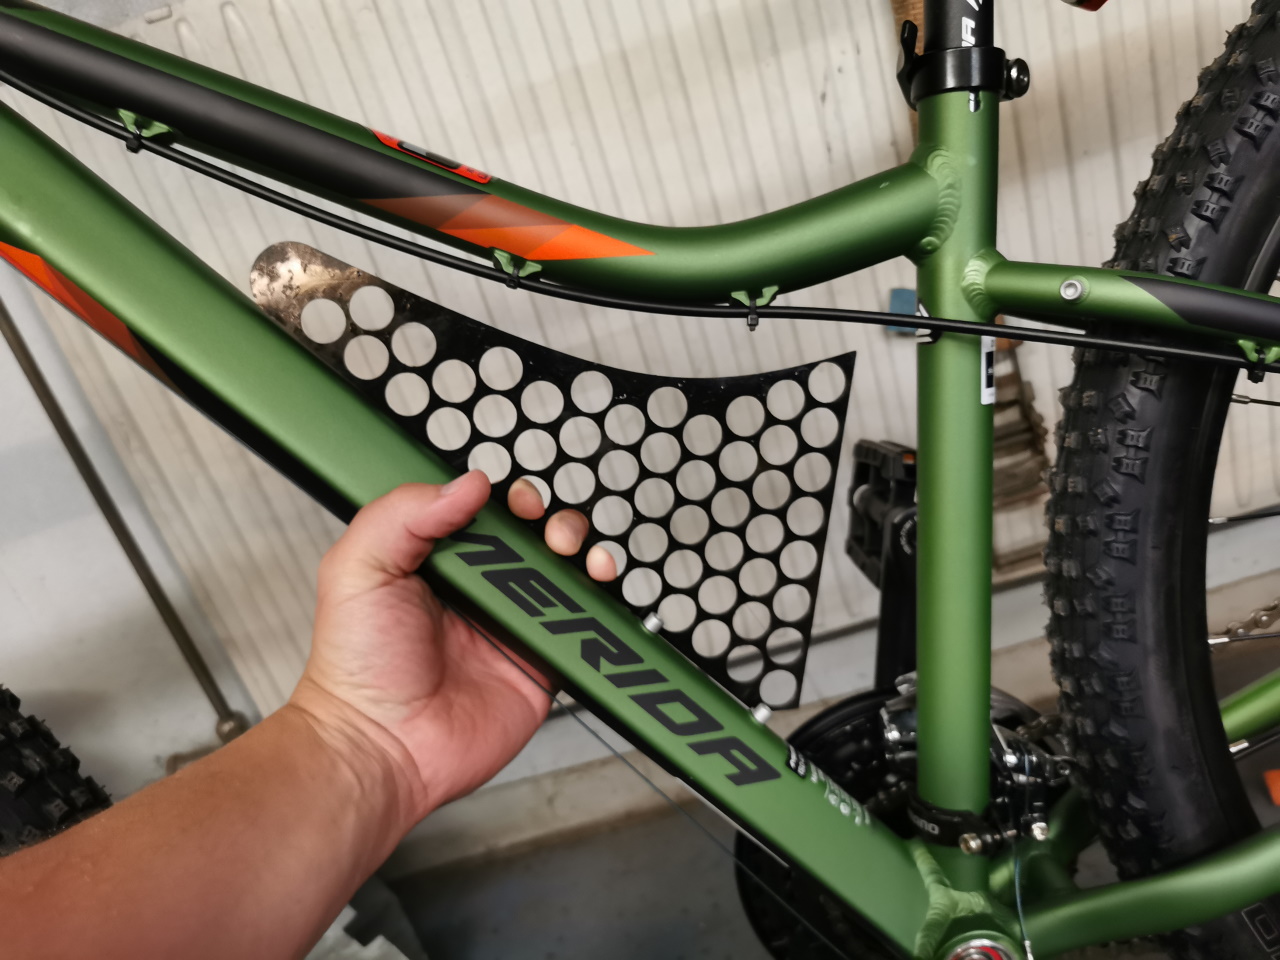
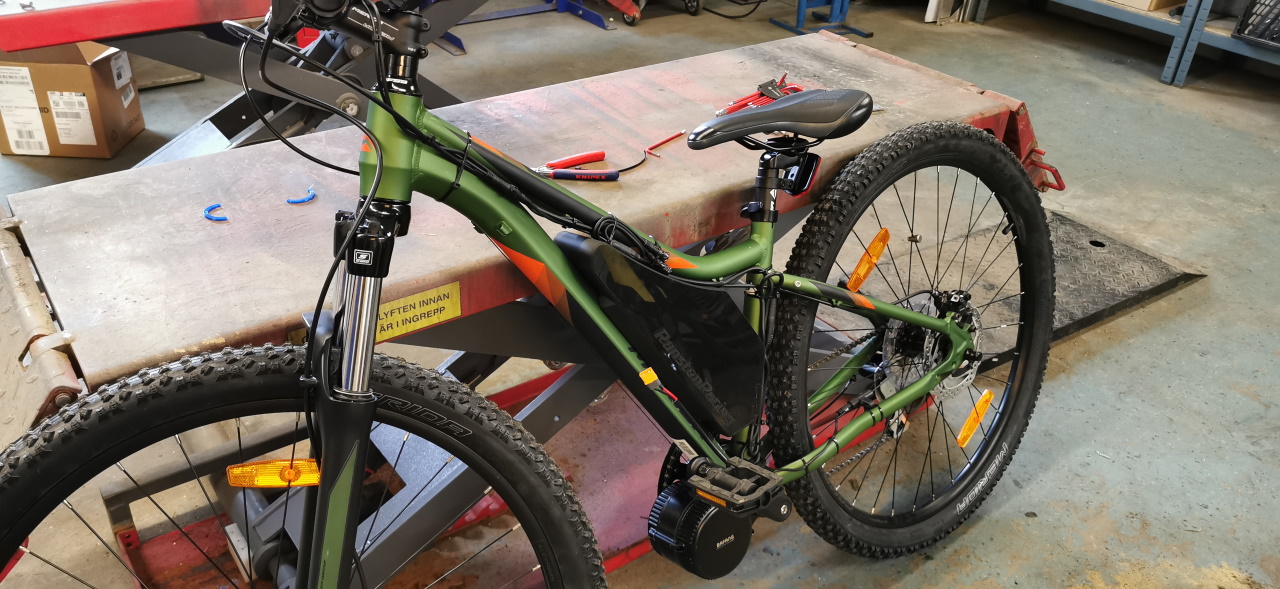
The first one was easy, some sort of Specialized bike without rear suspension. The problem with theese bikes is to build a battery that looks good in the frame.. I had built a battery earlier that he liked but wanted to increase it from 13s5p to 14s5p, so I printed an extension..

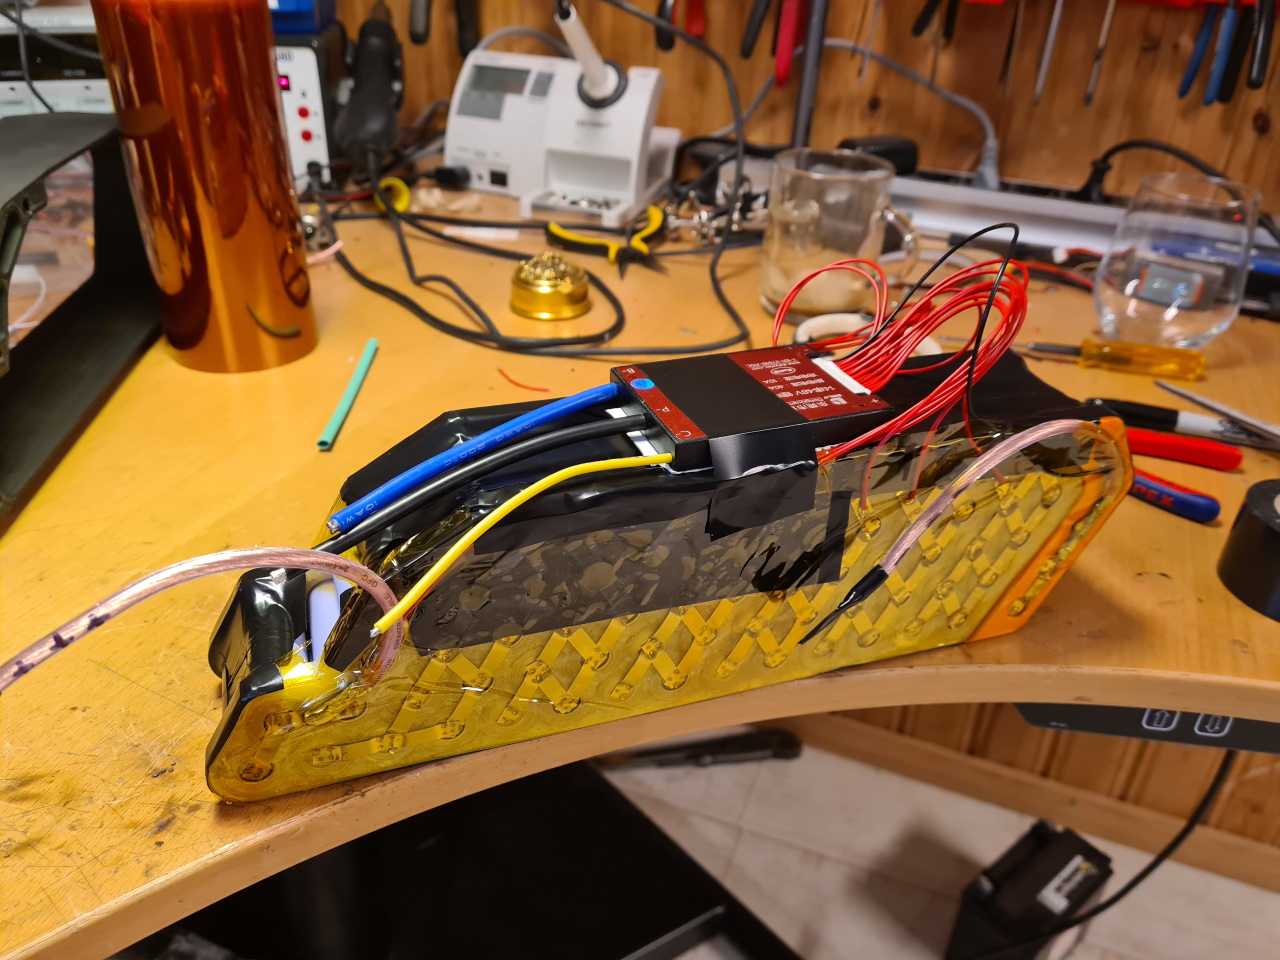
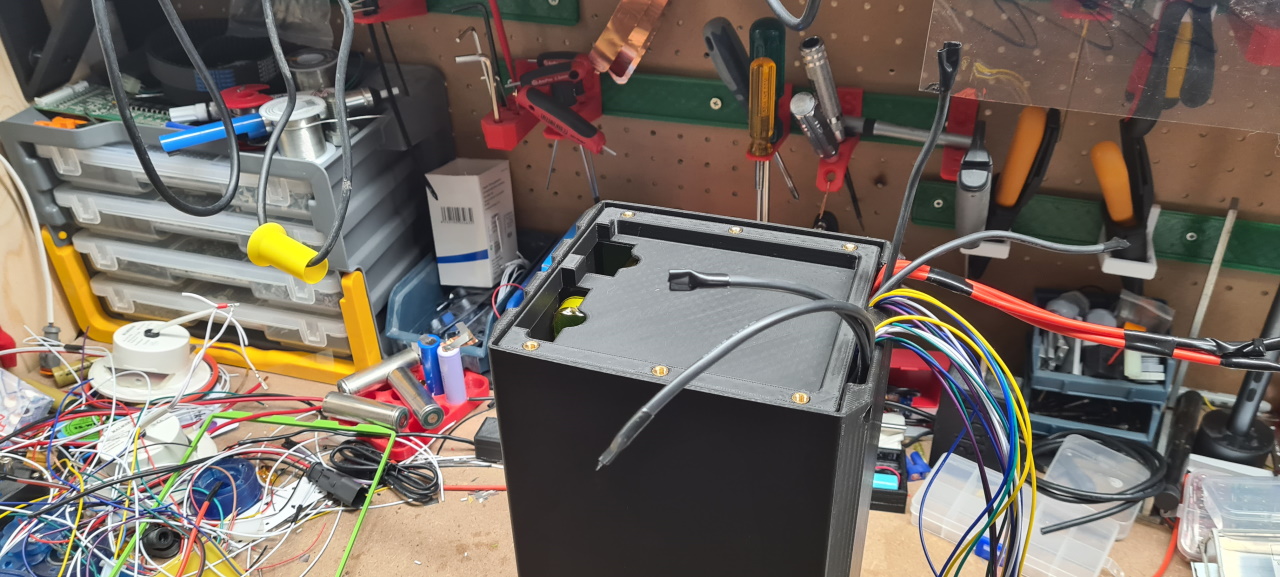
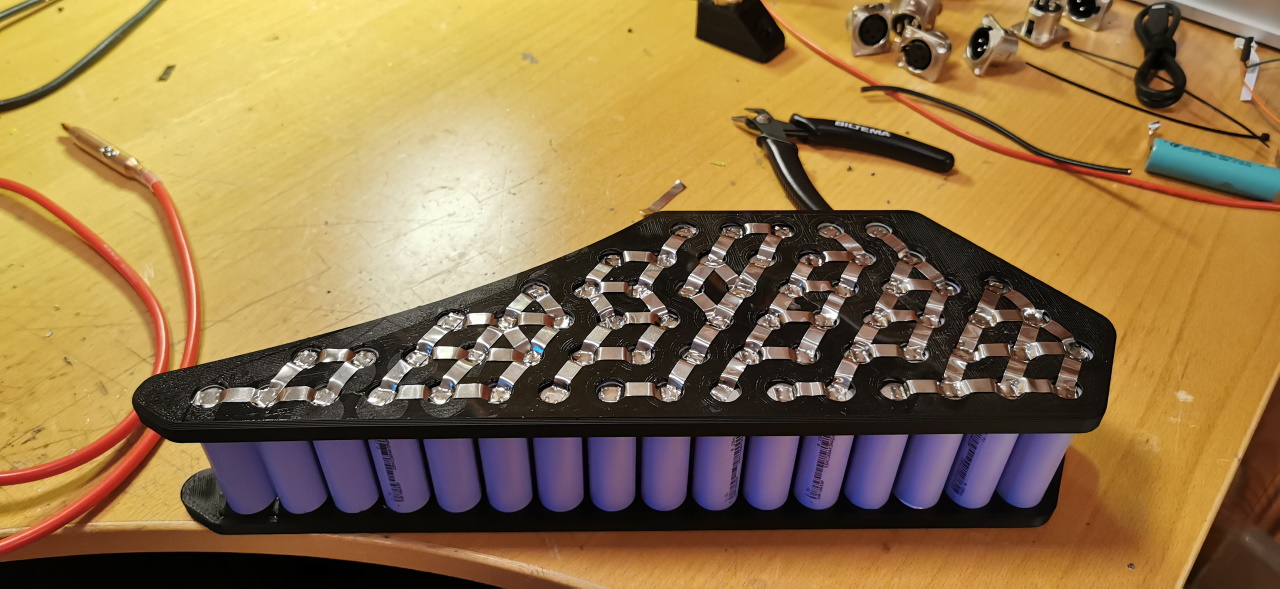
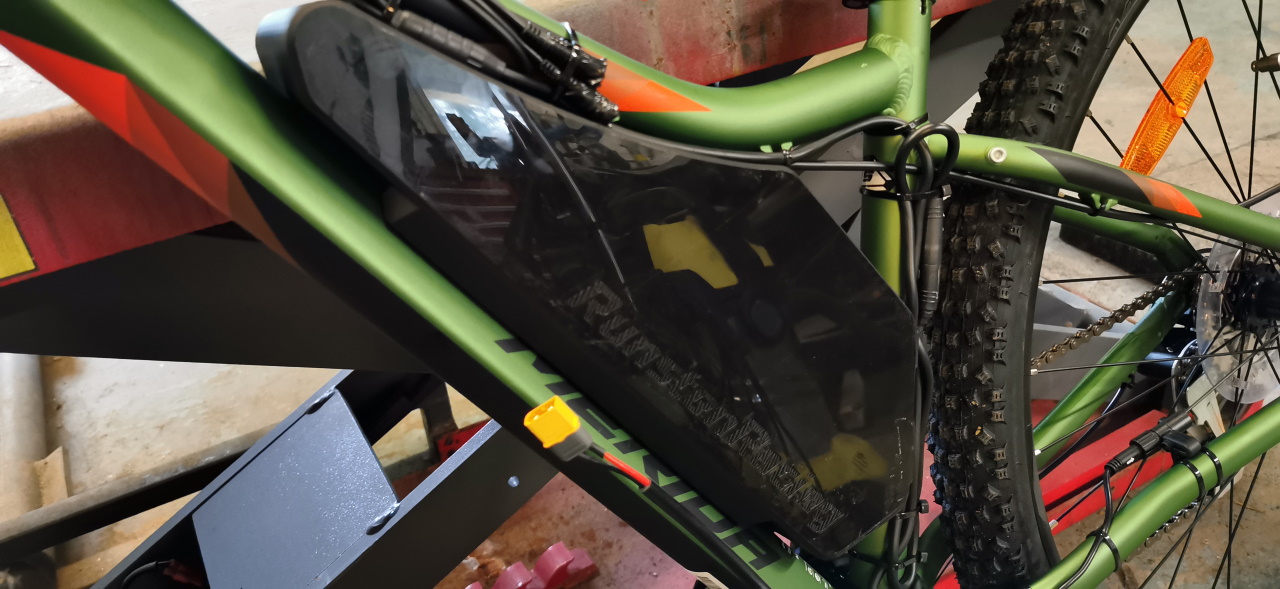
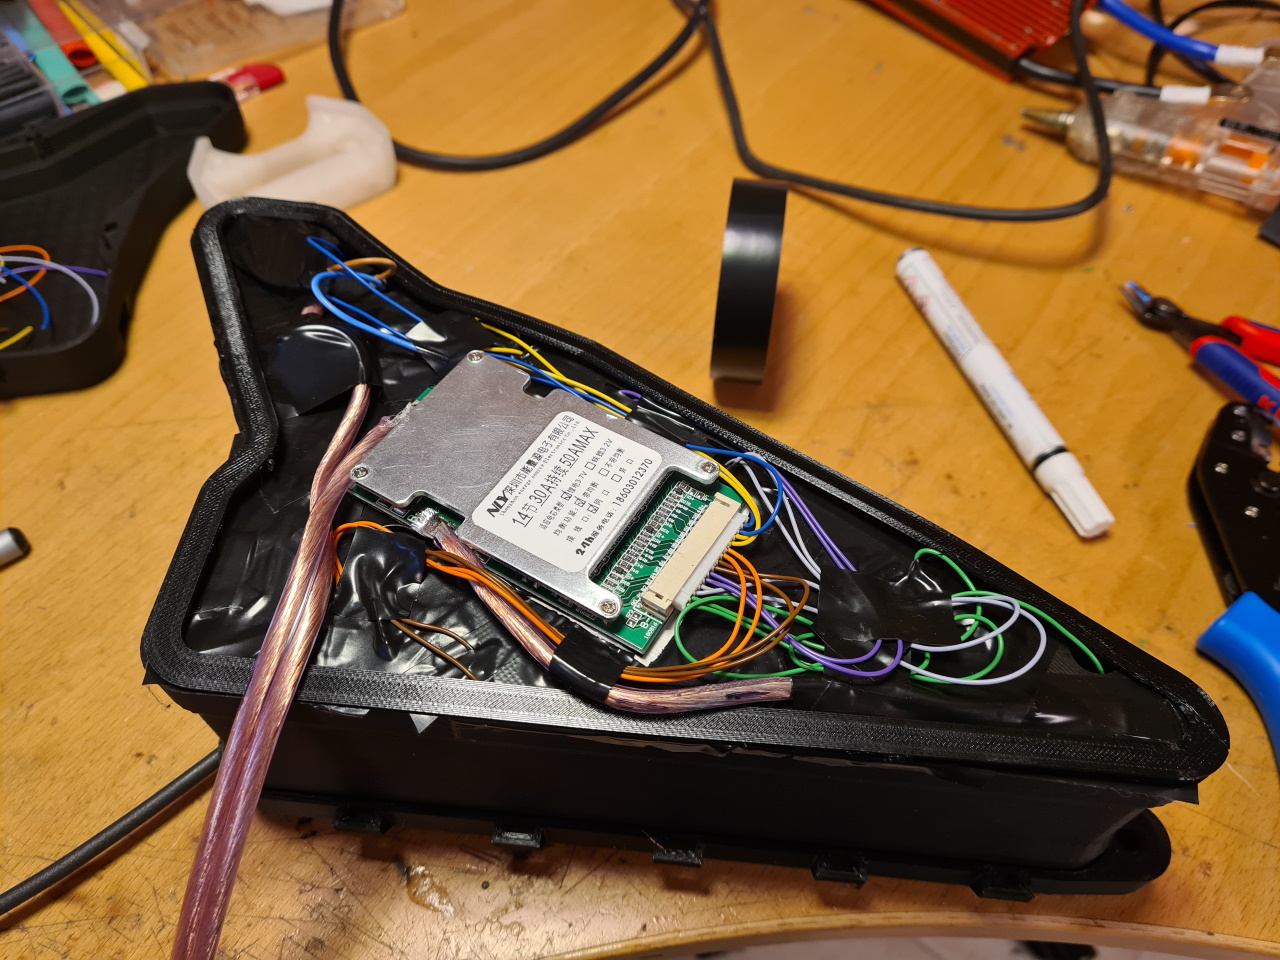
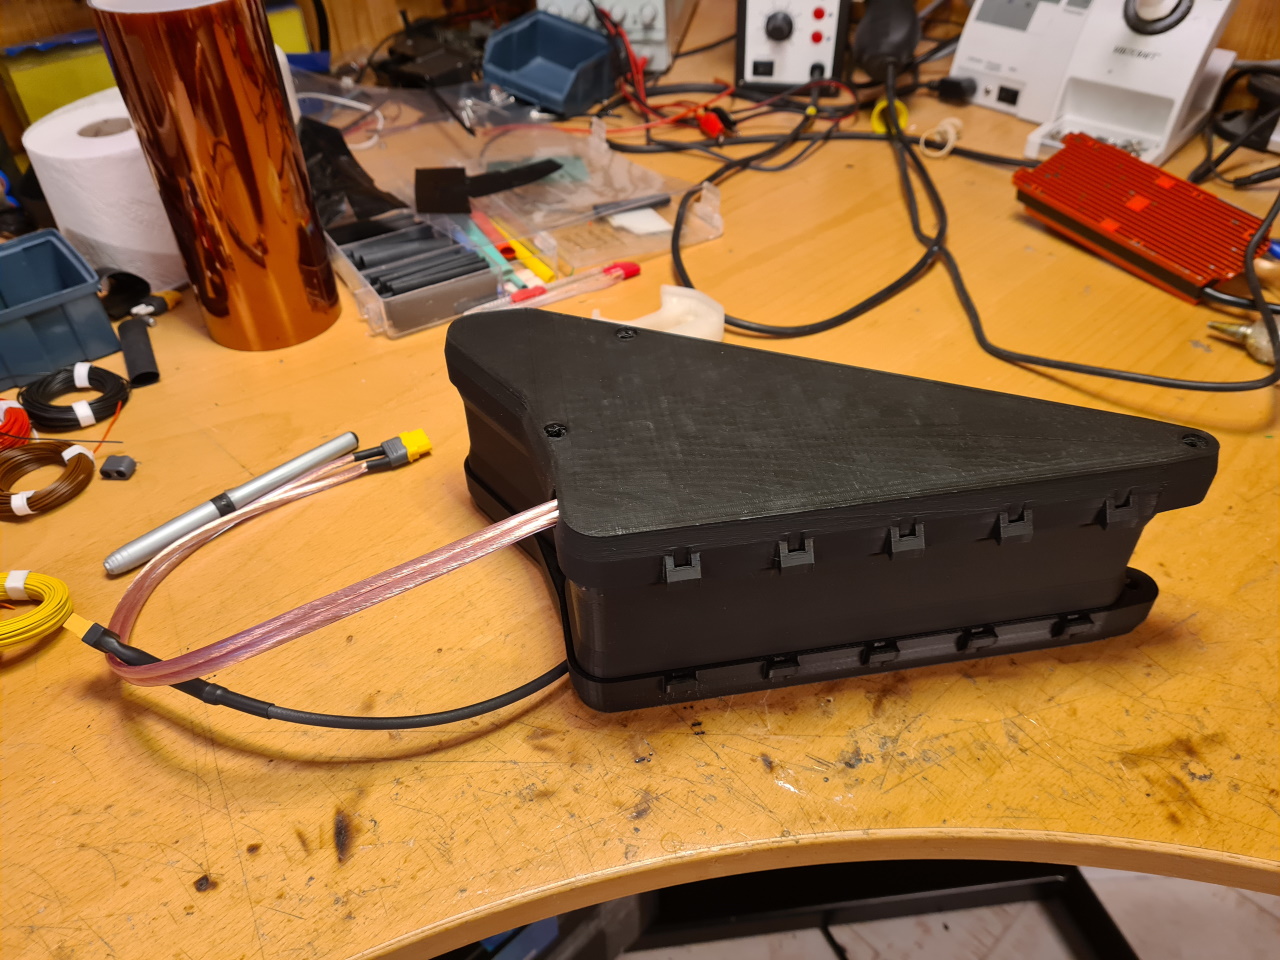
Here the pack is welded, the BMS is soldered and mounted on top – only the power leads left to fix.

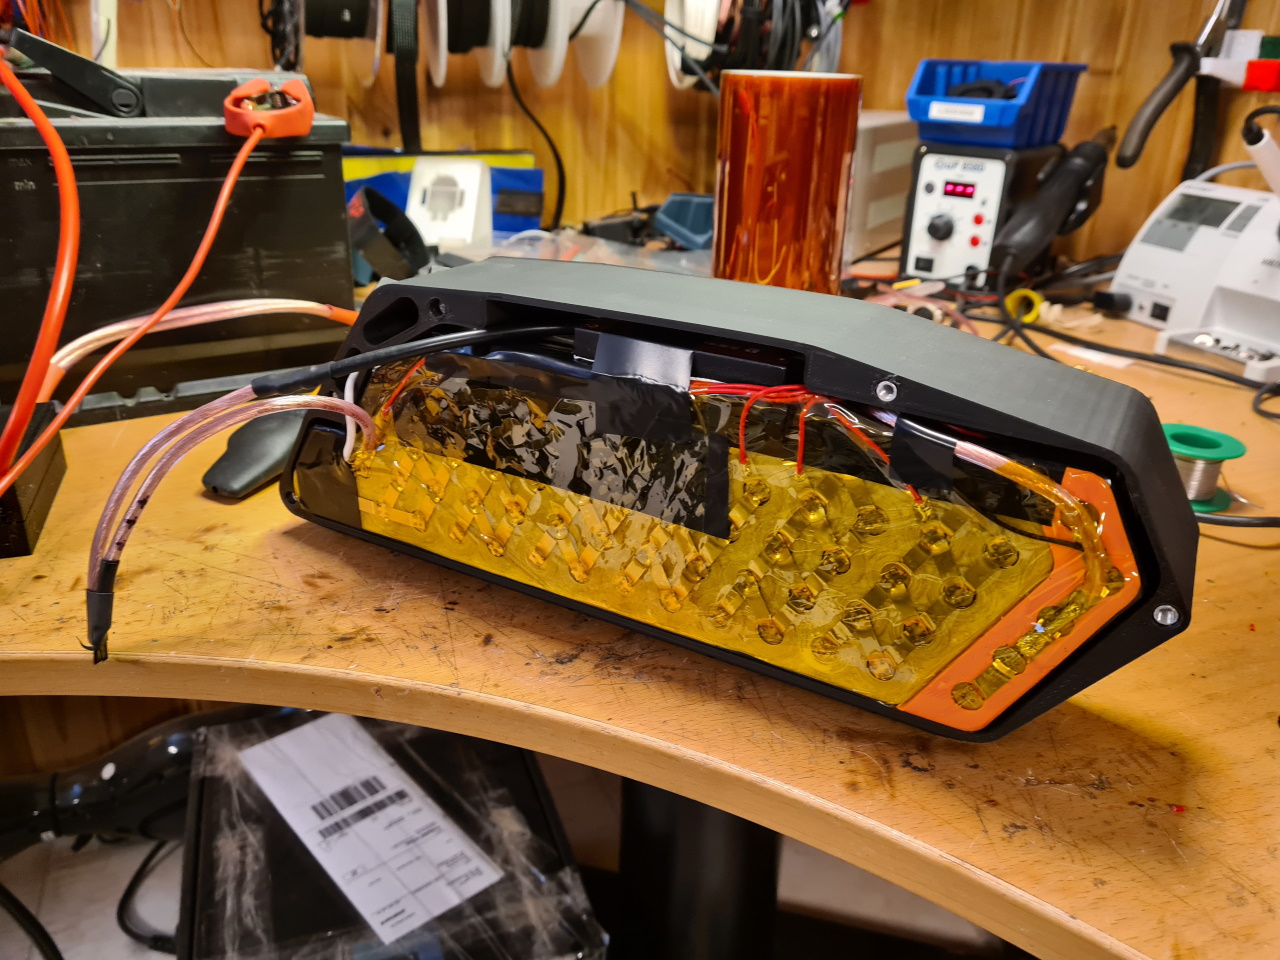
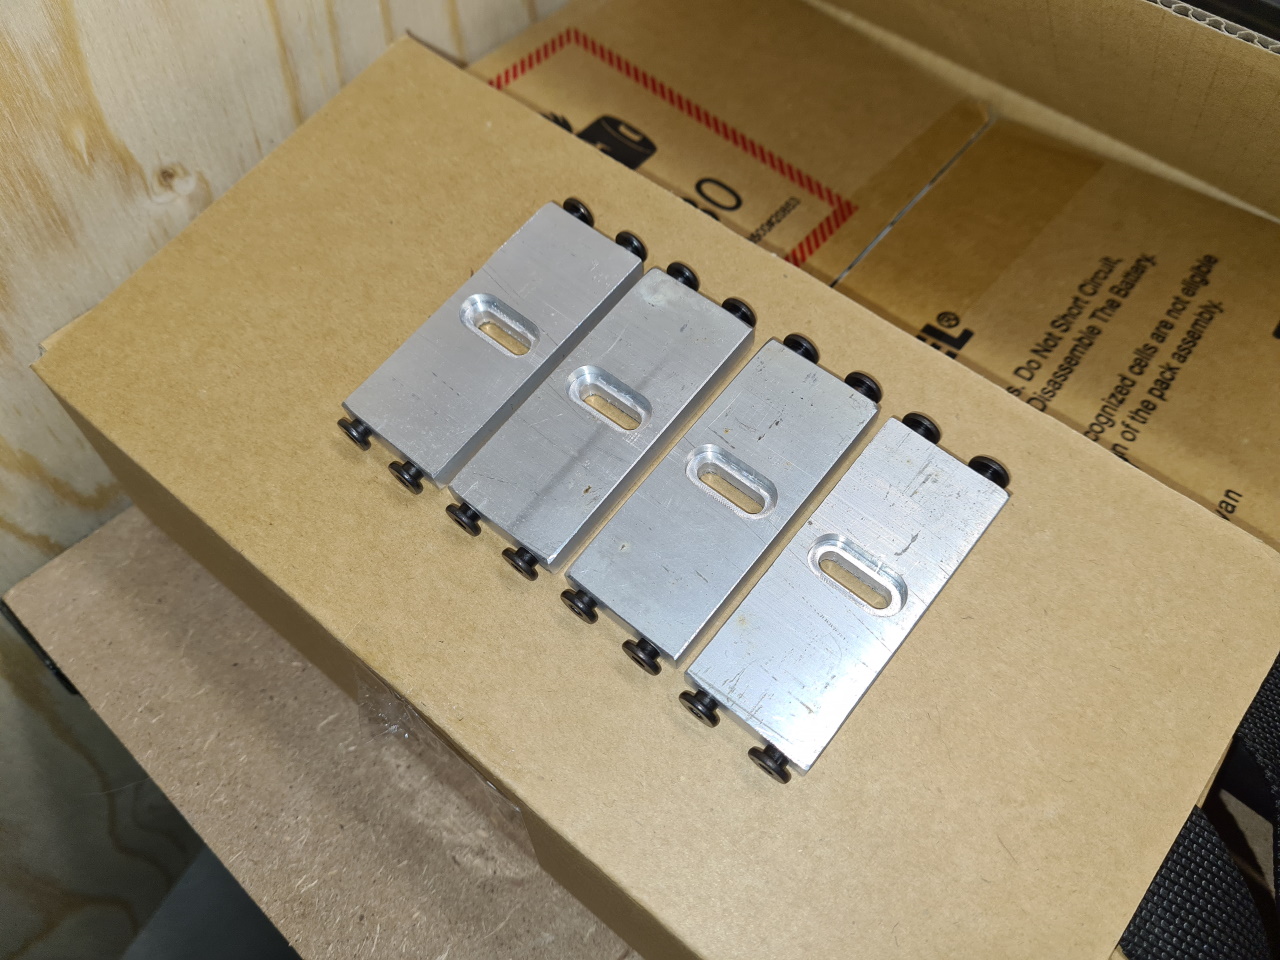
The battery cover is mounted. Here I used 6mm aluminium rods that I drilled and threaded to hold the box together. Later on I found M5 thread inserts that – when mounted correctly – bonds great to the plastic print. Much less work and a better result.

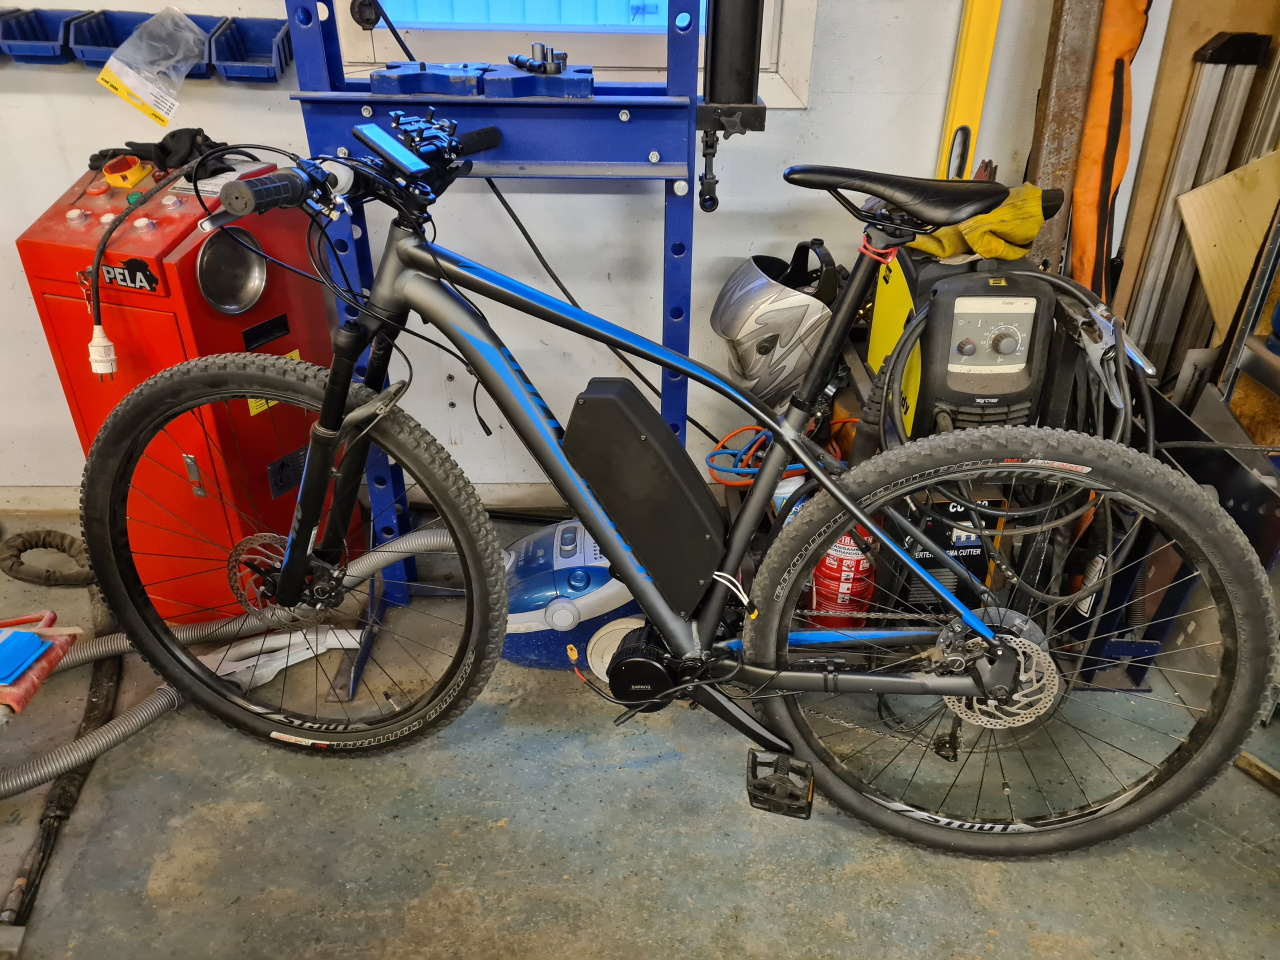
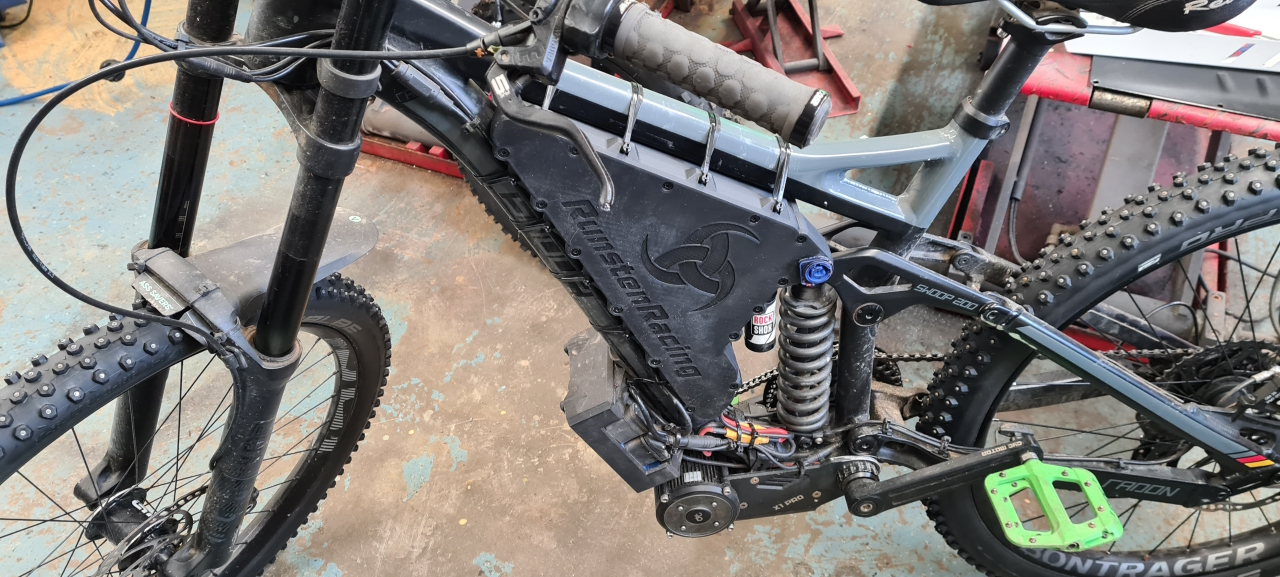
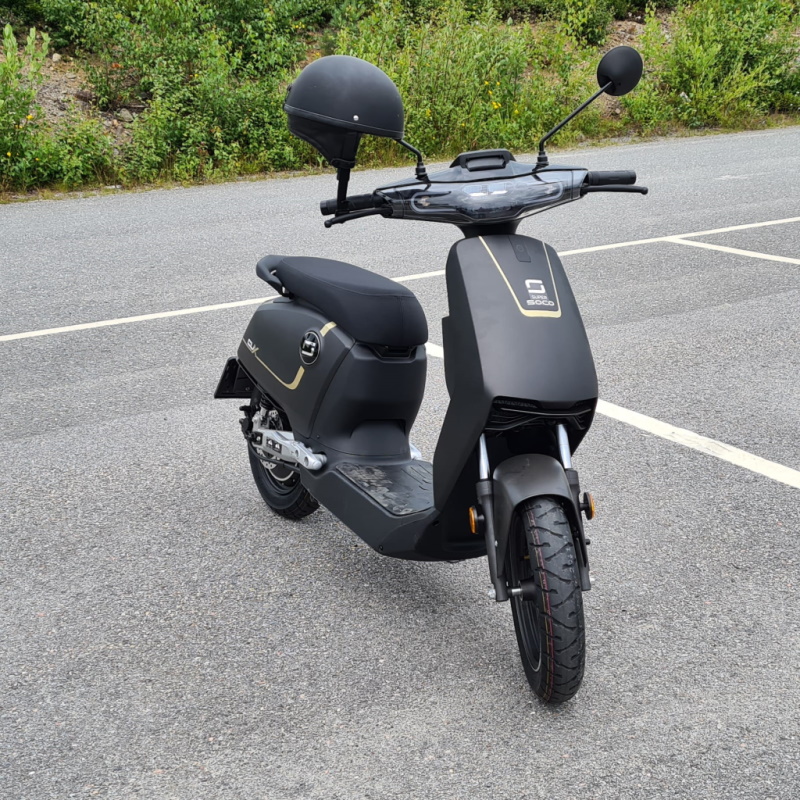
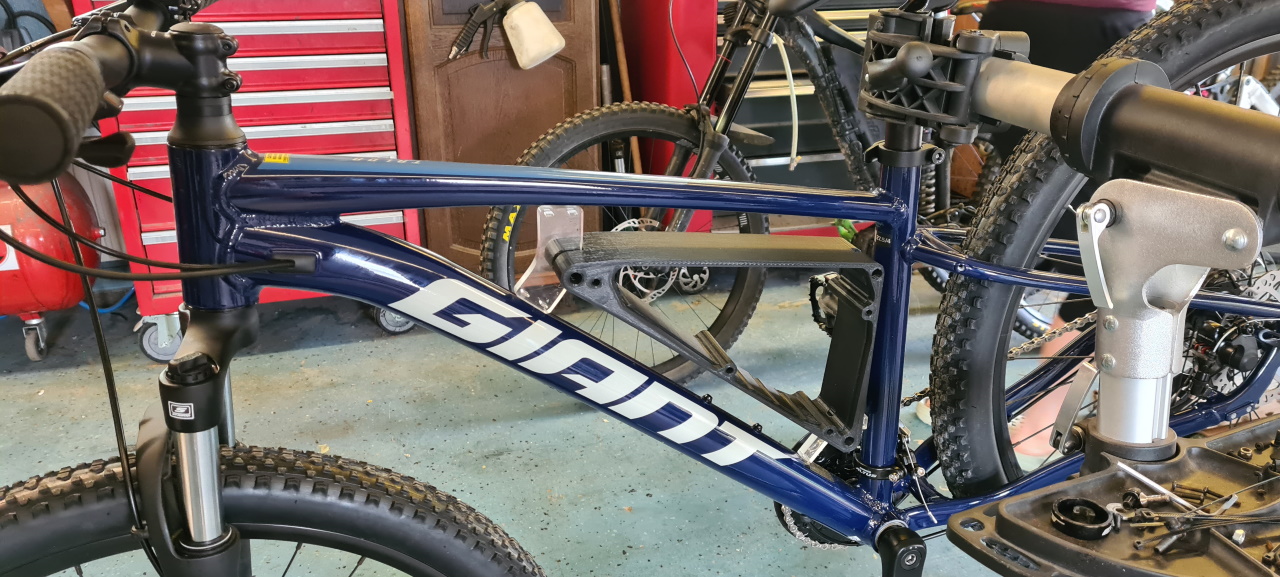
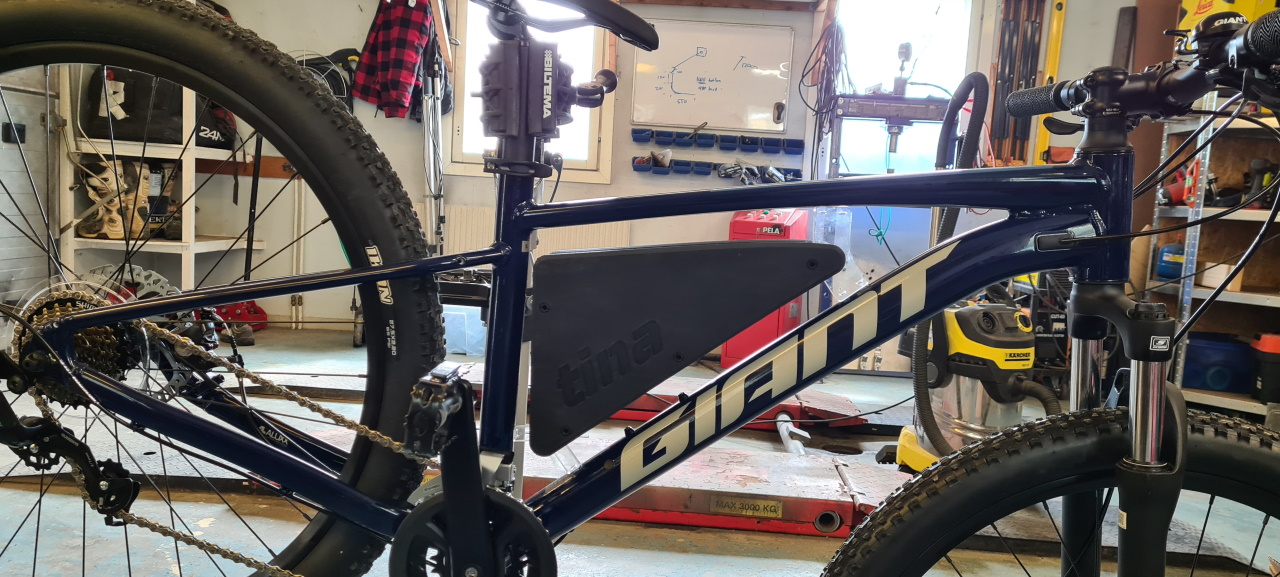
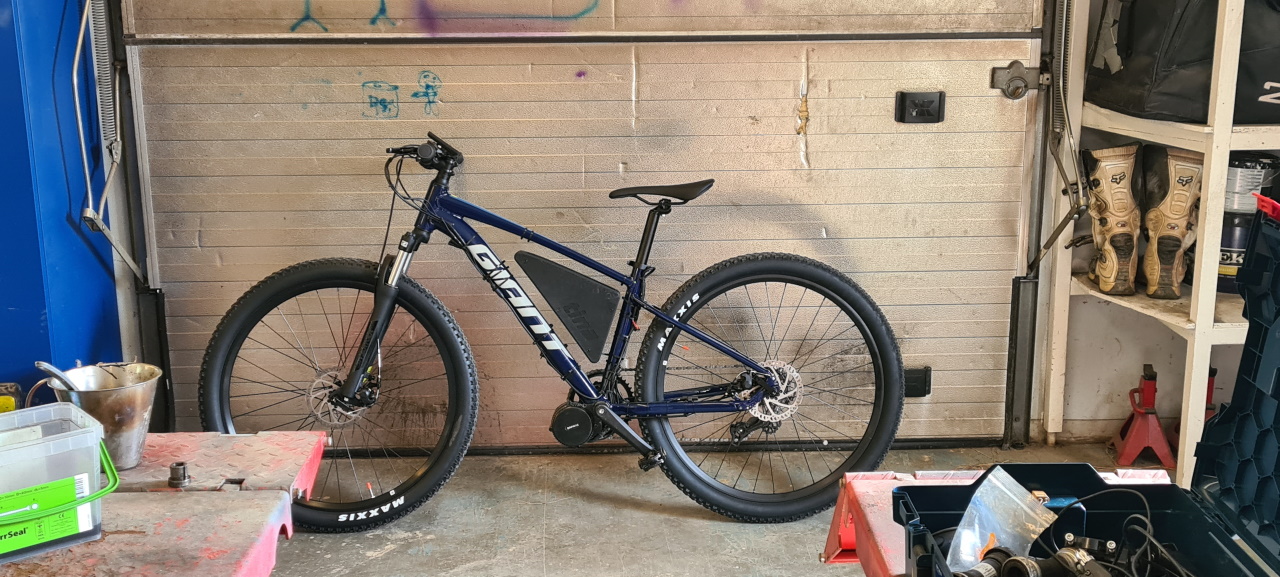
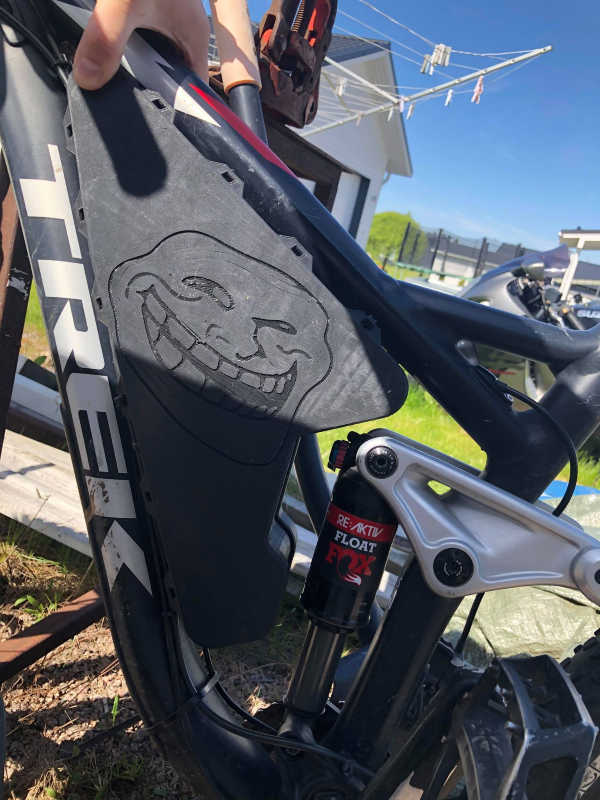
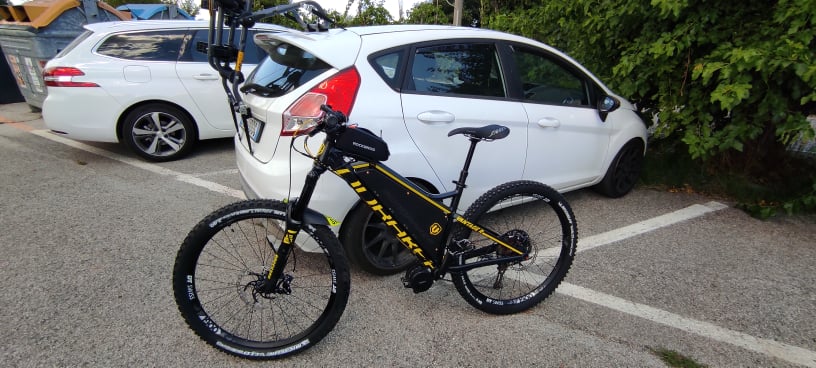
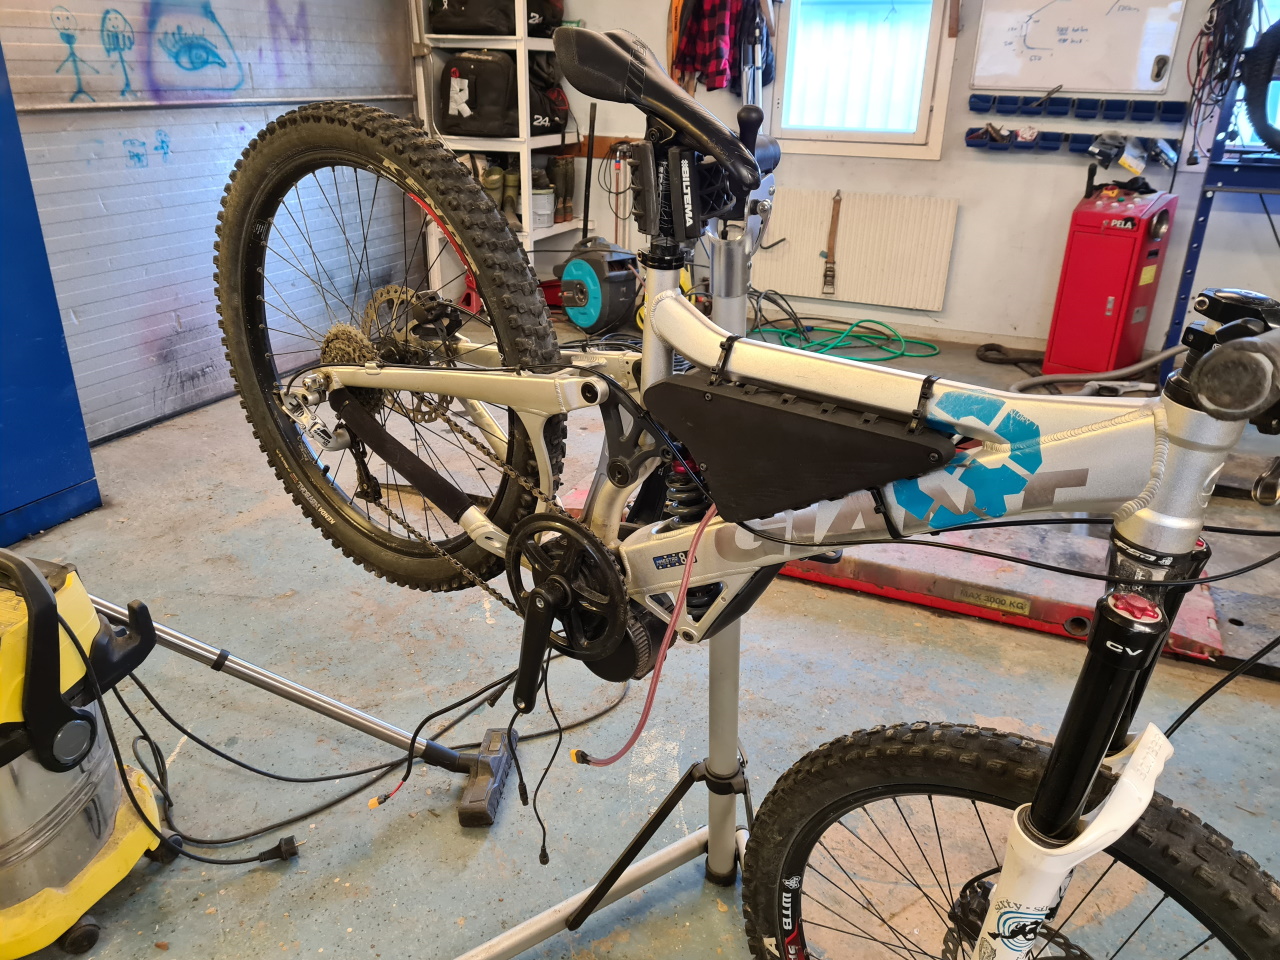
Mounted in the frame the battery sits like this. Looks more or less like a standard battery, nothing special but it works. 52V 12,5Ah and a cont current output of 62.5A is enough to power most anything for quite some time.
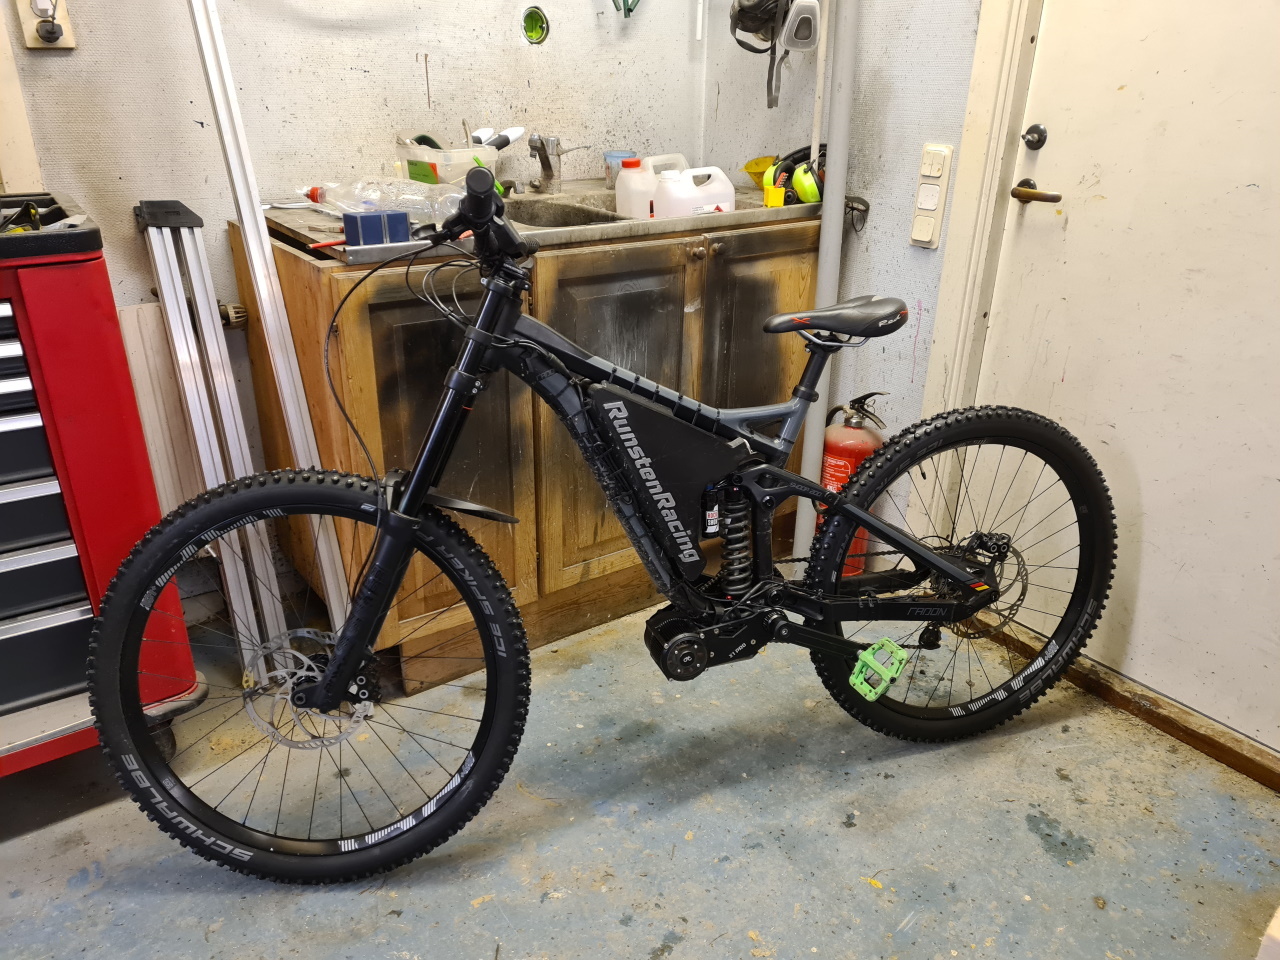
Mongoose

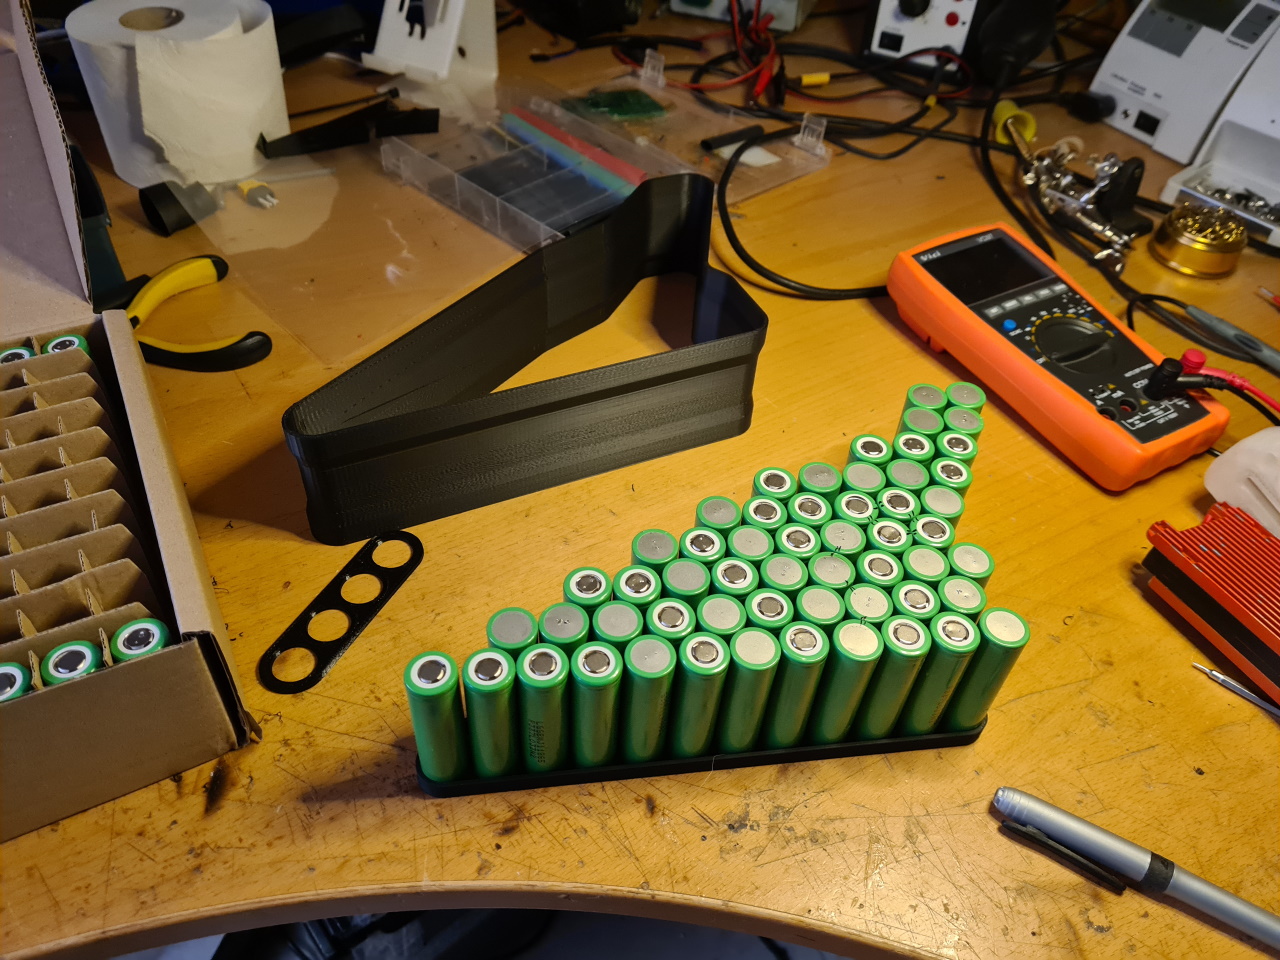
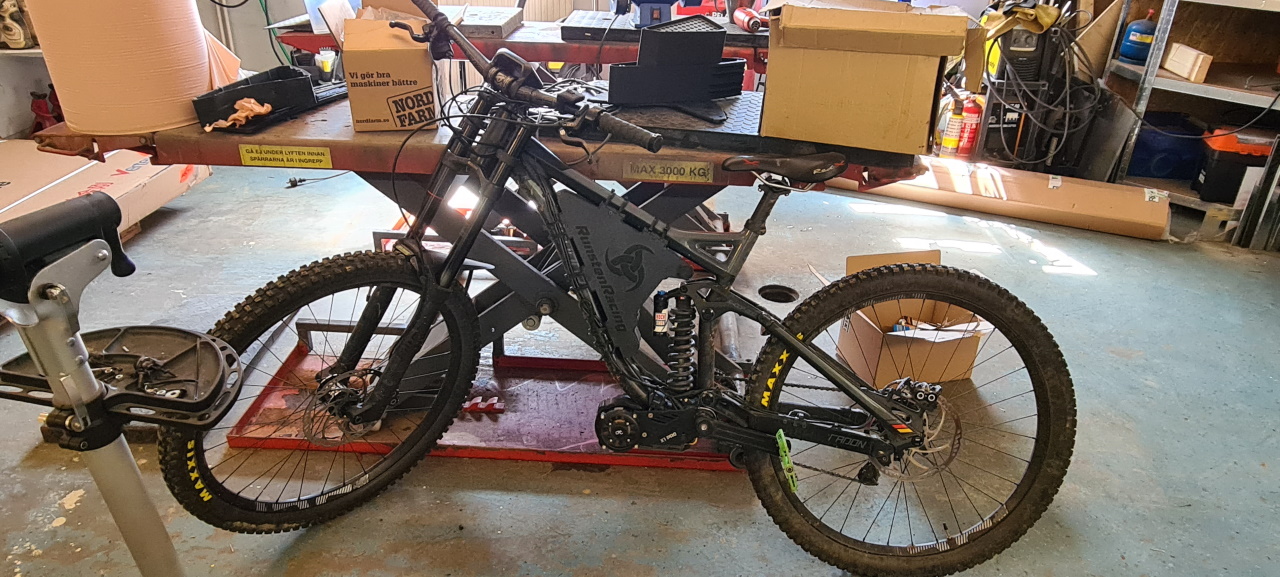
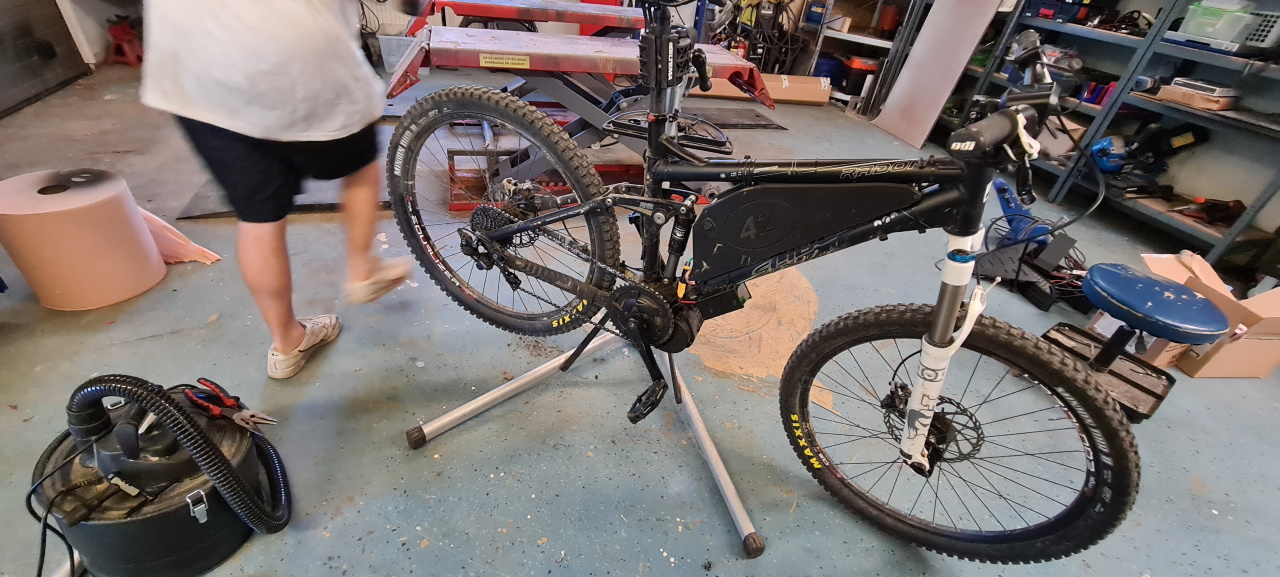
Now this frame is an odd bird..

Unfortunately I didn’t get any pictures of the frame while it was here, so this’ll have to do. The suspension on this frame works in a really wierd way and there’s virtually no space inside the frame to build a battery, so we had to place it underneath the frame.

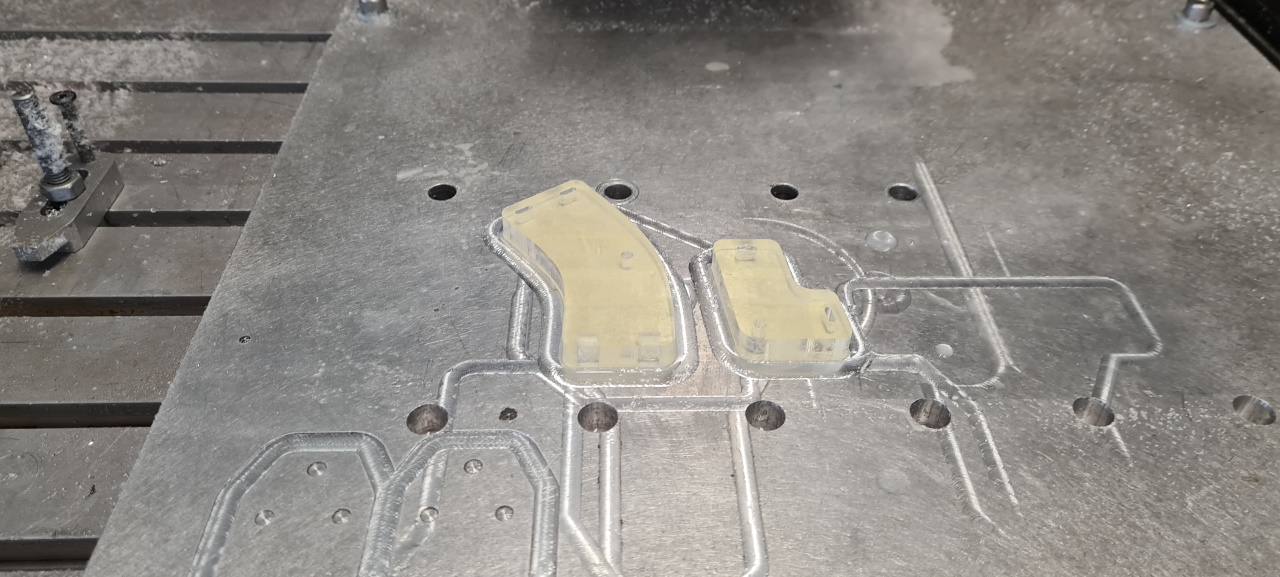
When making a battery like this the first thing I do is, like in the picture above, take a picture of the frame as straight from the side as possible with a reference measurement in the picture, like the caliper taped to the frame above. That way I can import the picture into Fusion360 to start design of the battery box.

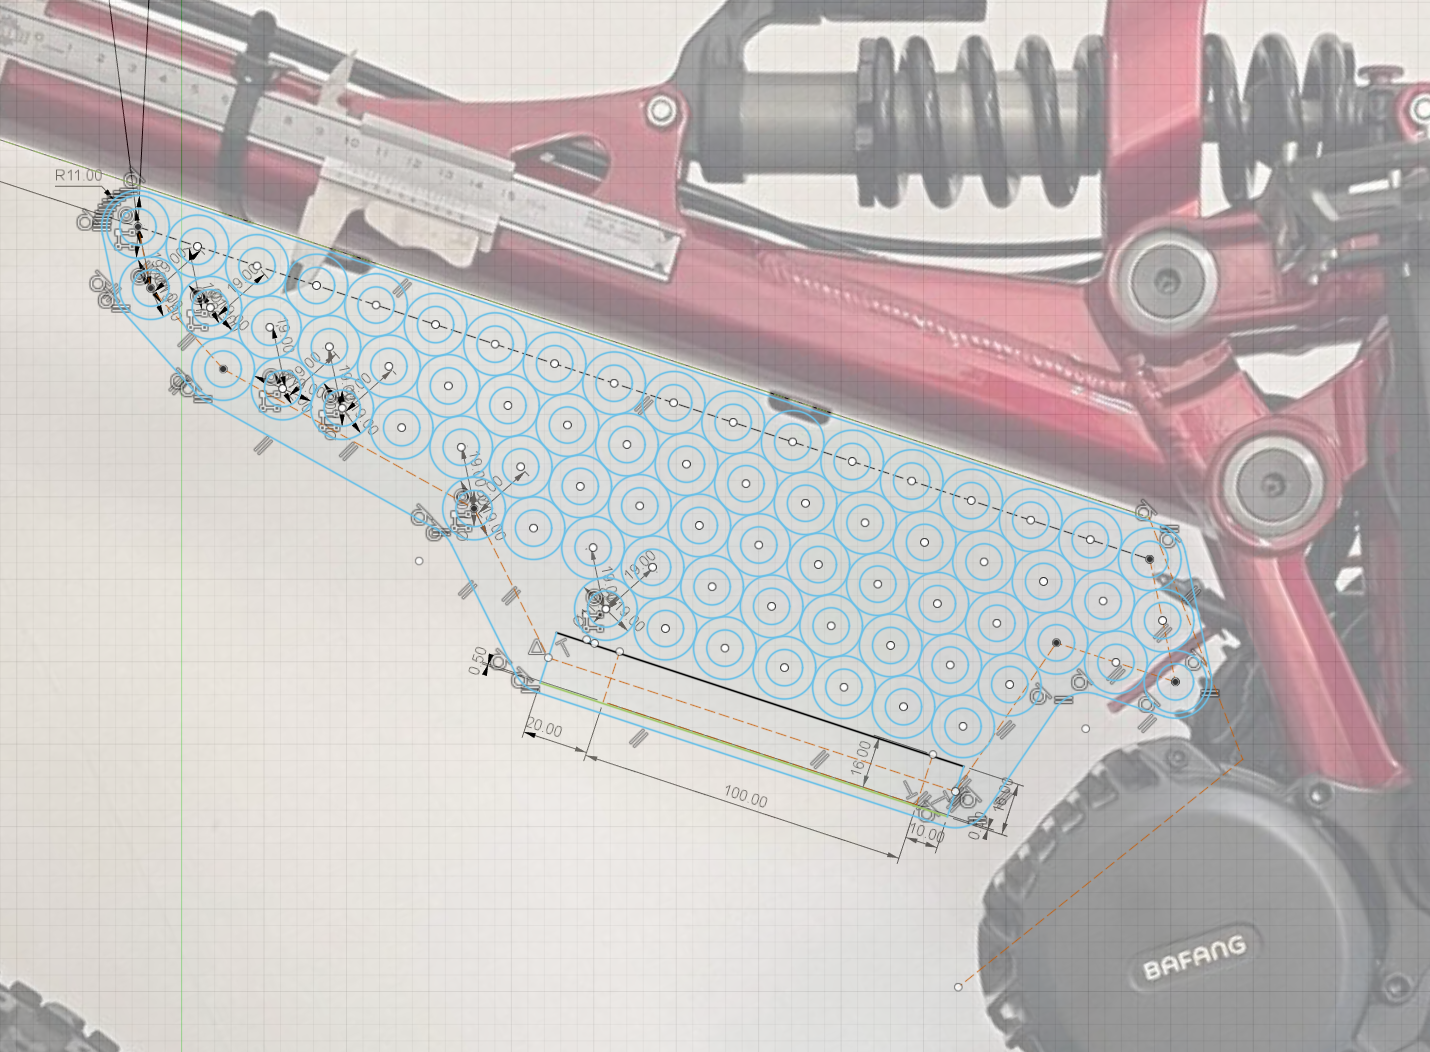
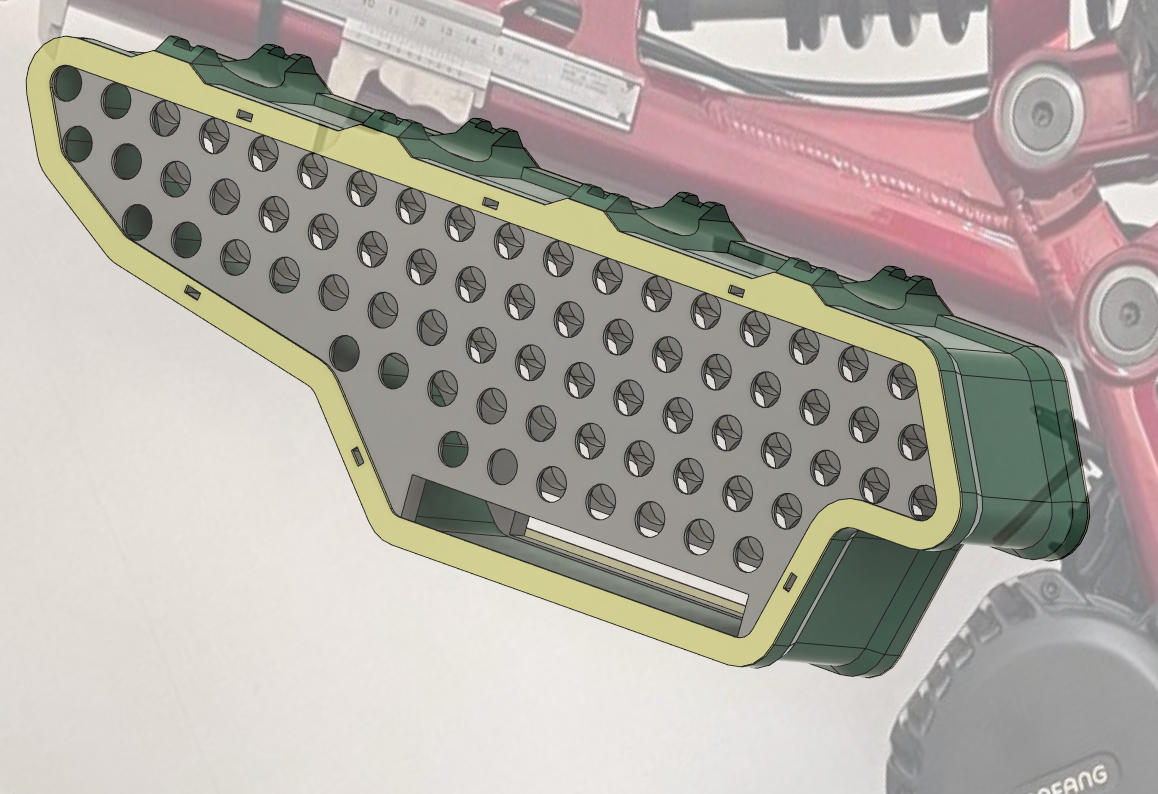
I then figure out the cell placement and the overall shape of the box and design the battery cellframe. From this drawing I make a PDF that I print on regular paper to test fit in the frame and when the fit is good I continue with the CAD.

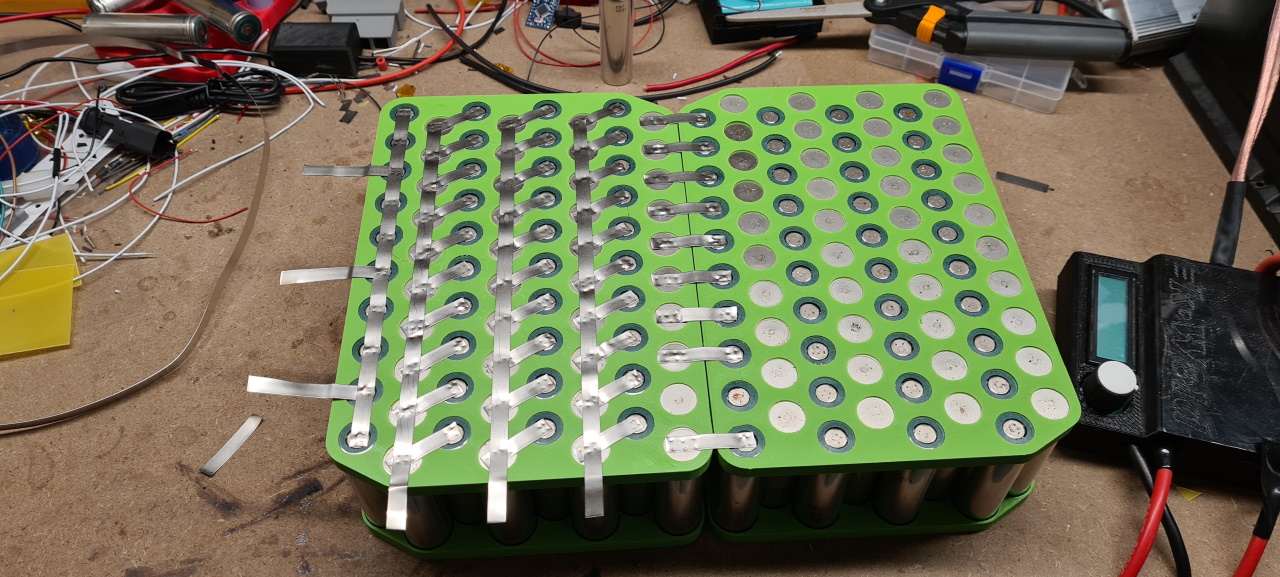
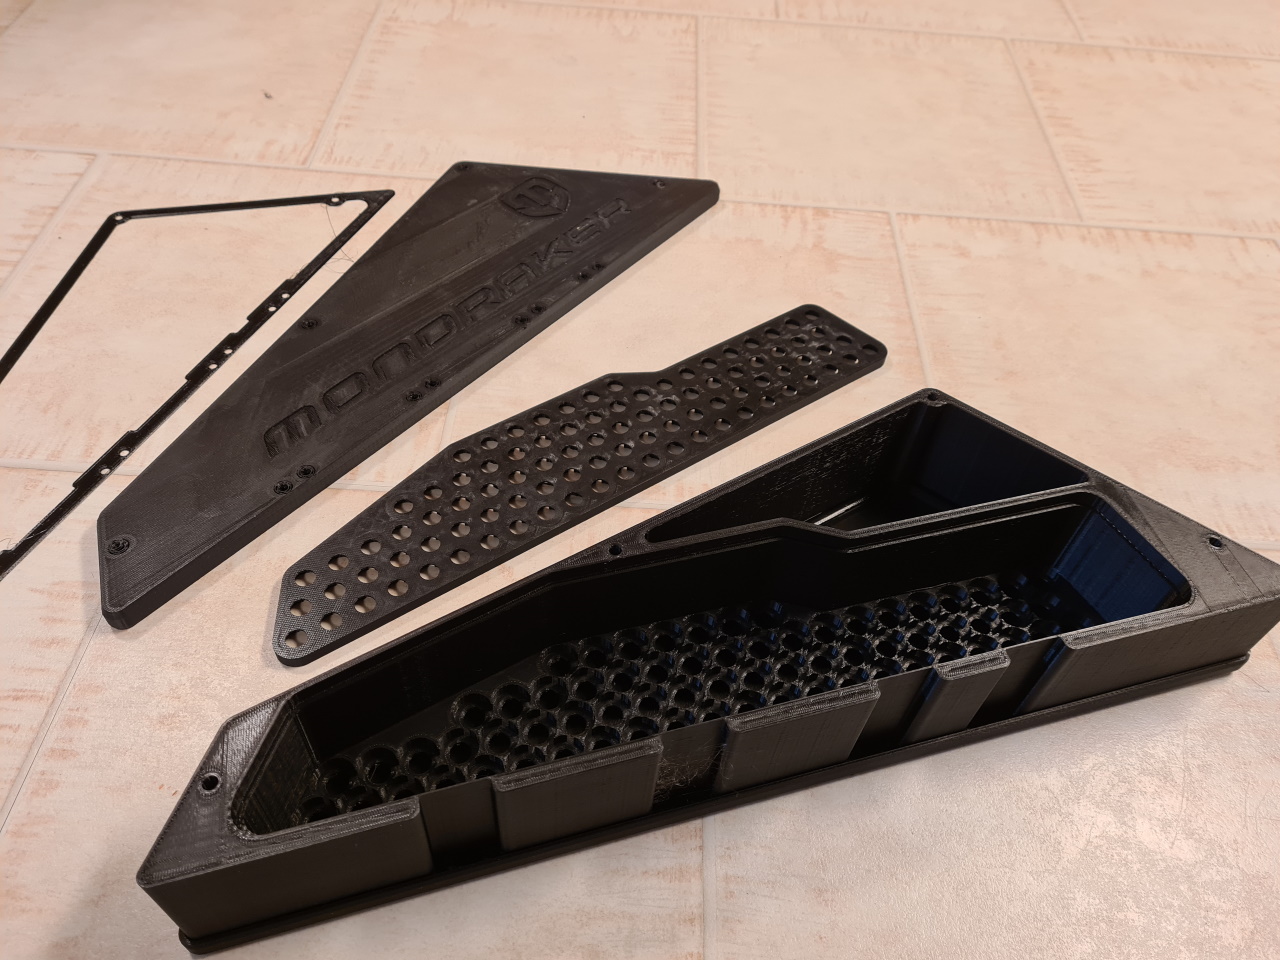
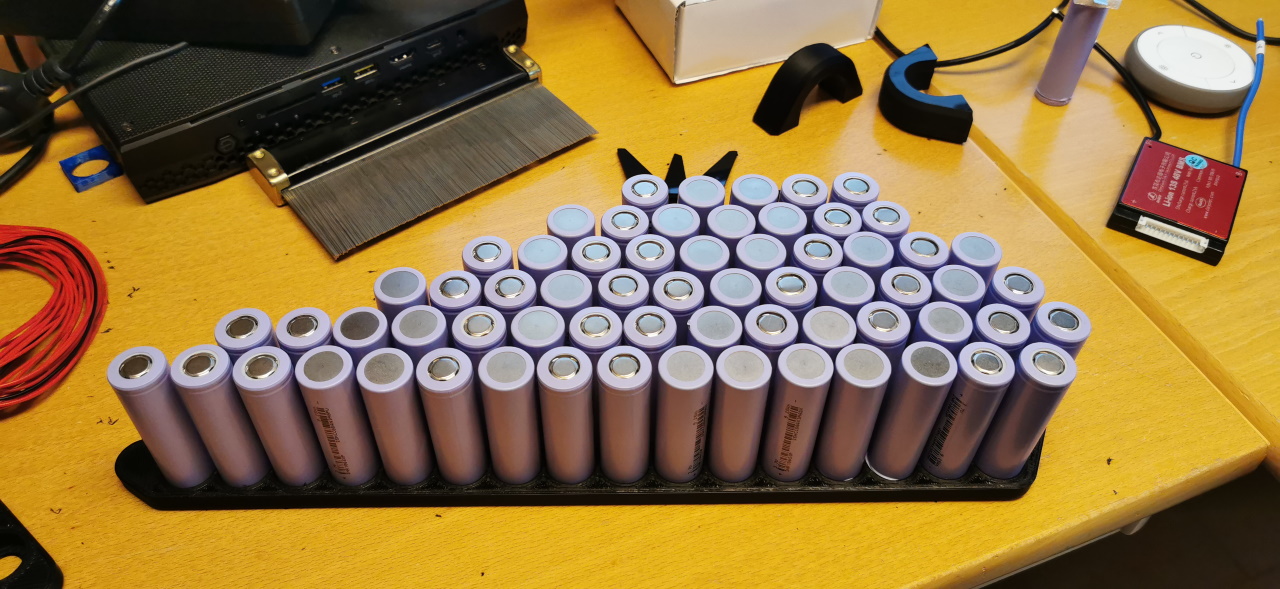
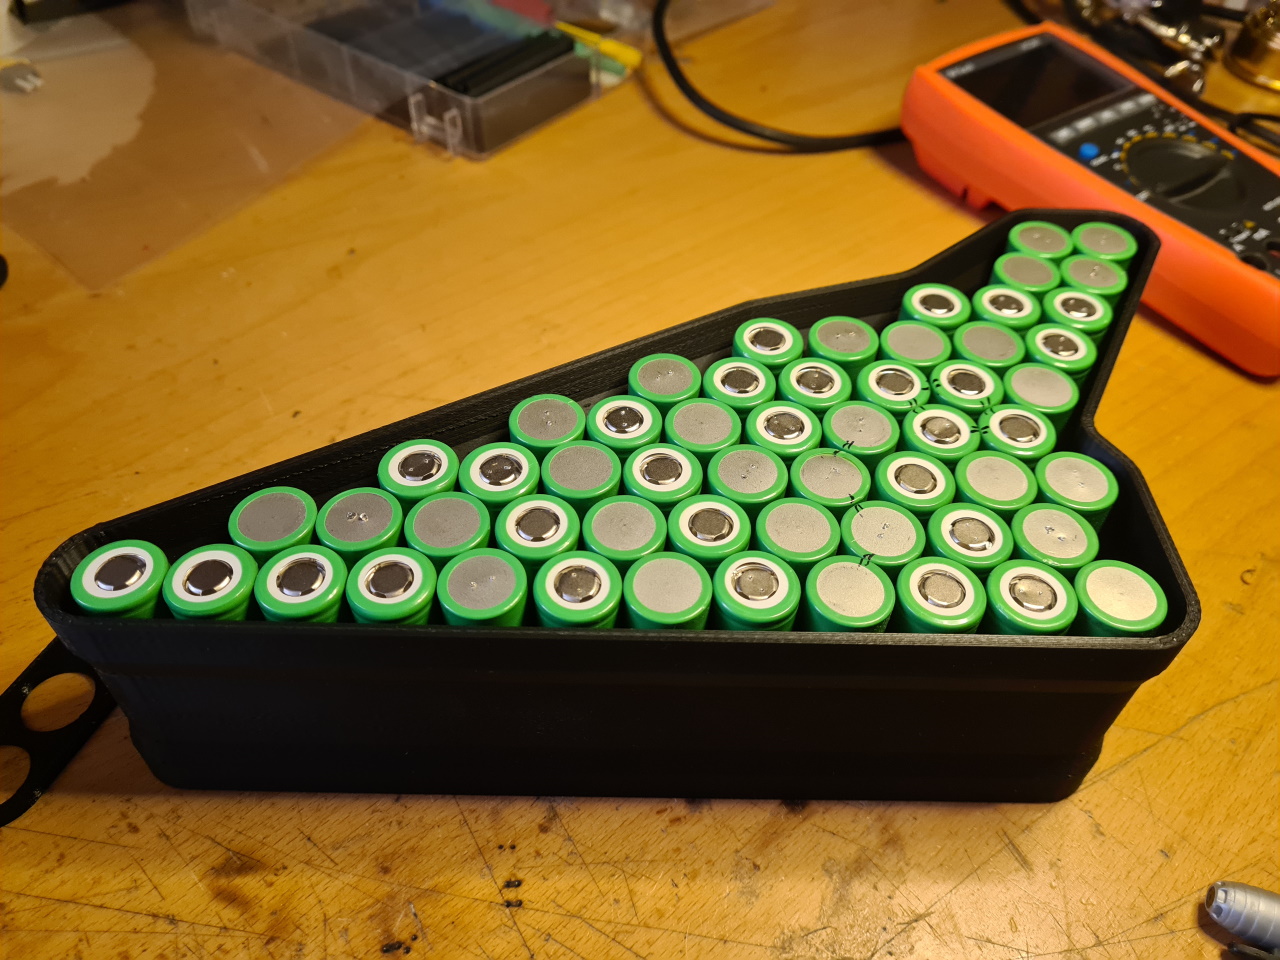
I make a 3D design of the cell frame making sure the cells will fit in the holes and that there is room for the BMS and all the cable routing. I also make sure there’s room for the bolts, or in this case we used zipties to hold the box together. When possible I try to make sure the layout of the cells is such that good power transfer between the cell clusters is achievable when welding the pack.

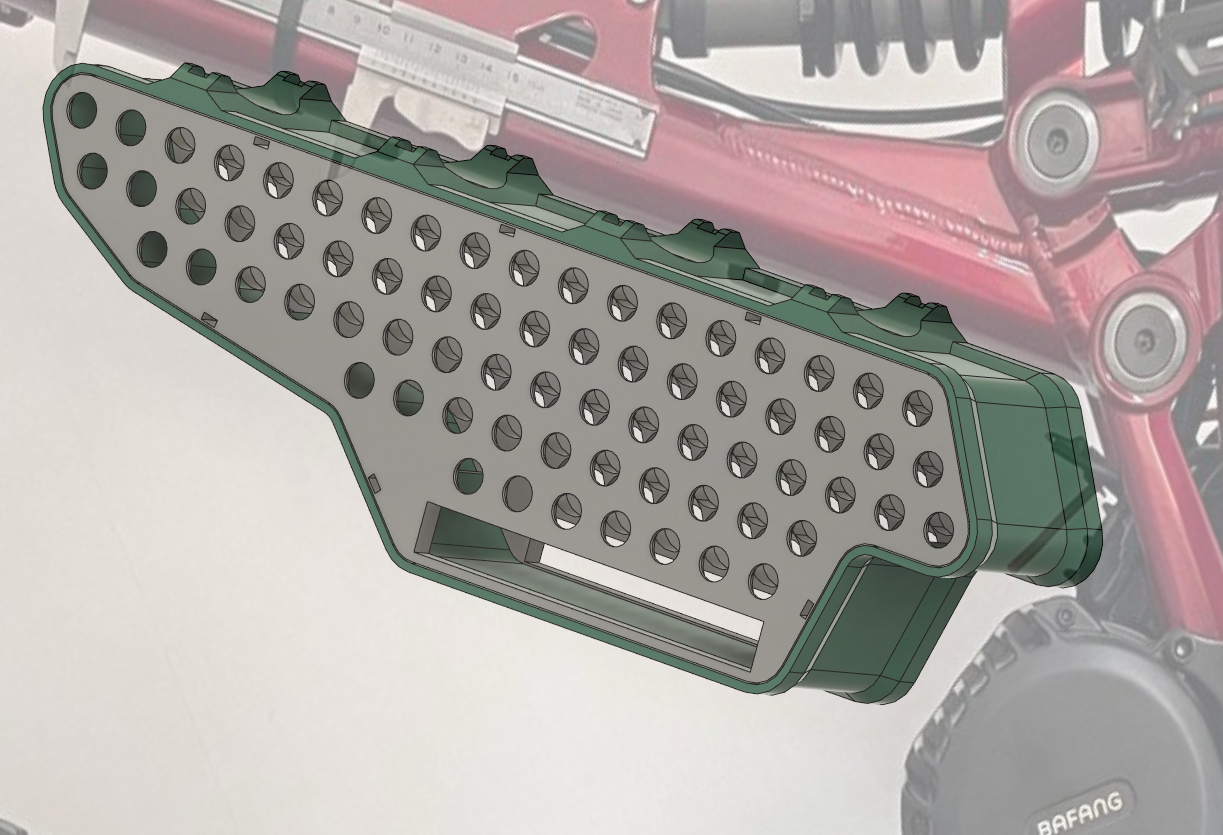
Next the Joiner is designed. Now the outer shape of the battery takes form. When possible I try to make brackets on the joiner that fits the frame for the most secure mounting possible. Channels for zipties are added to the design to make mounting easy and secure.
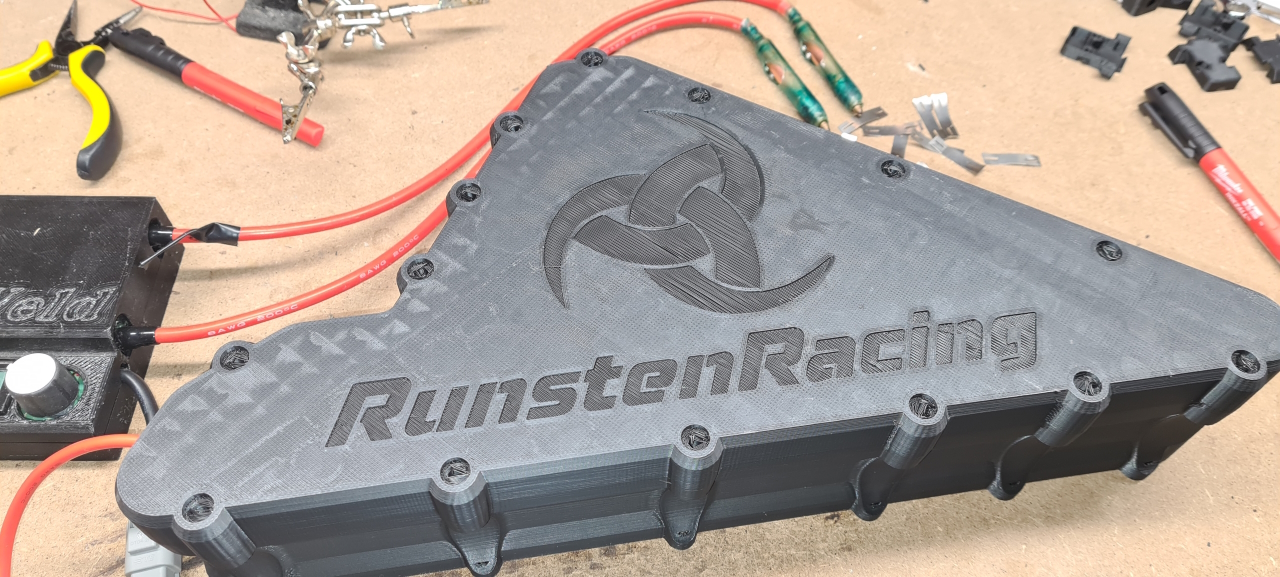
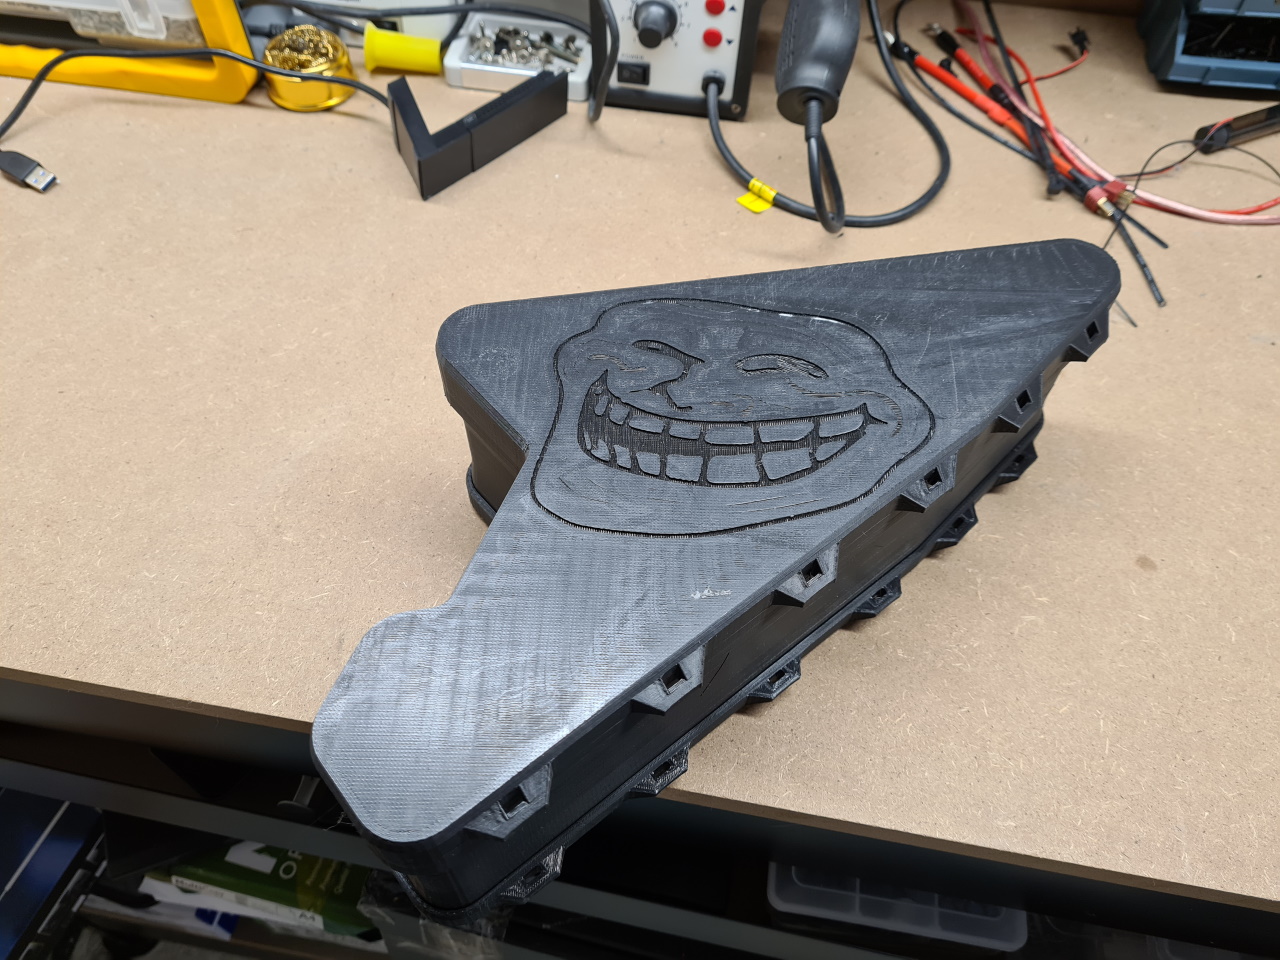
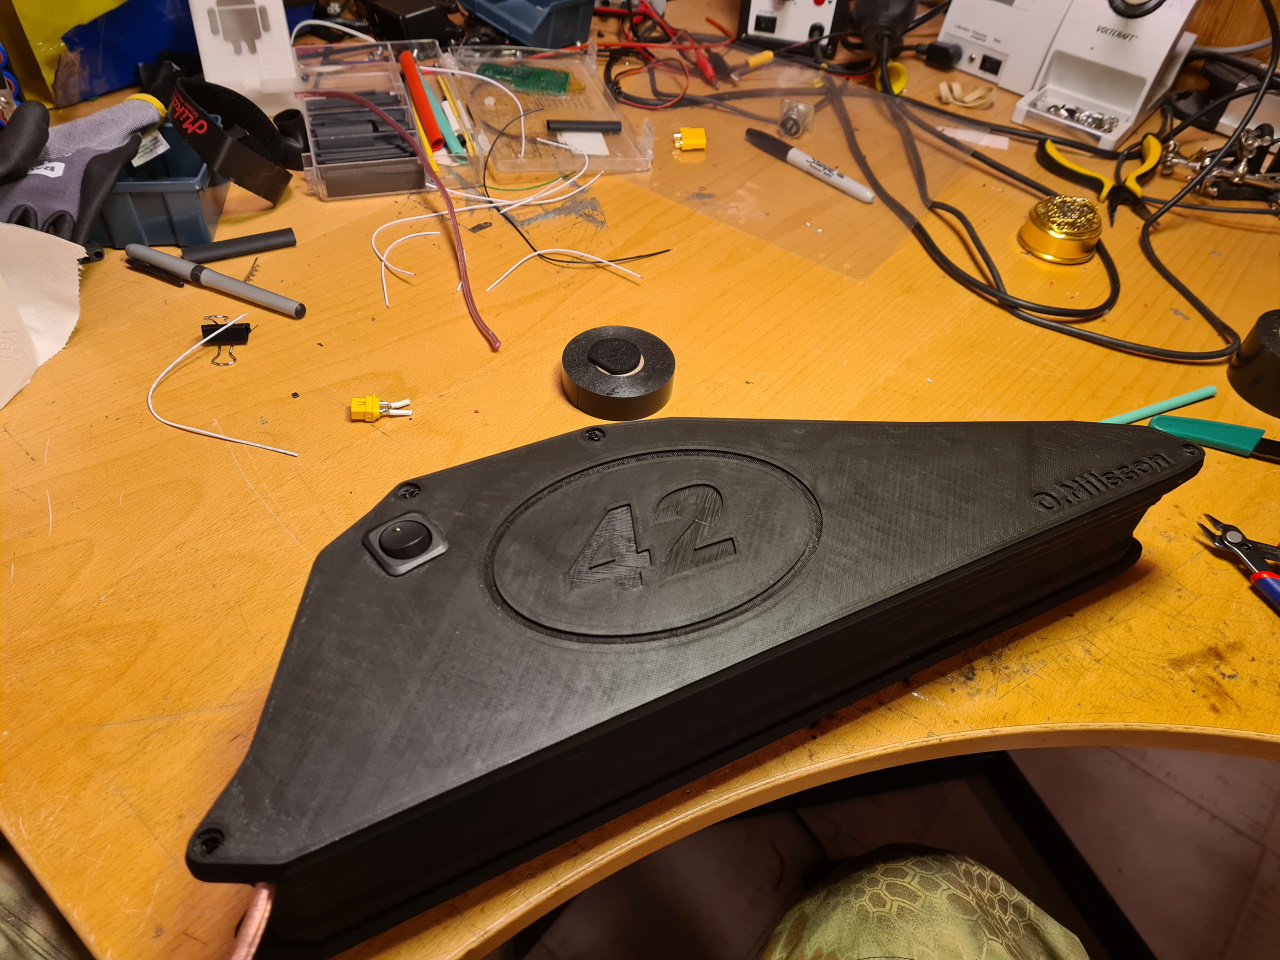
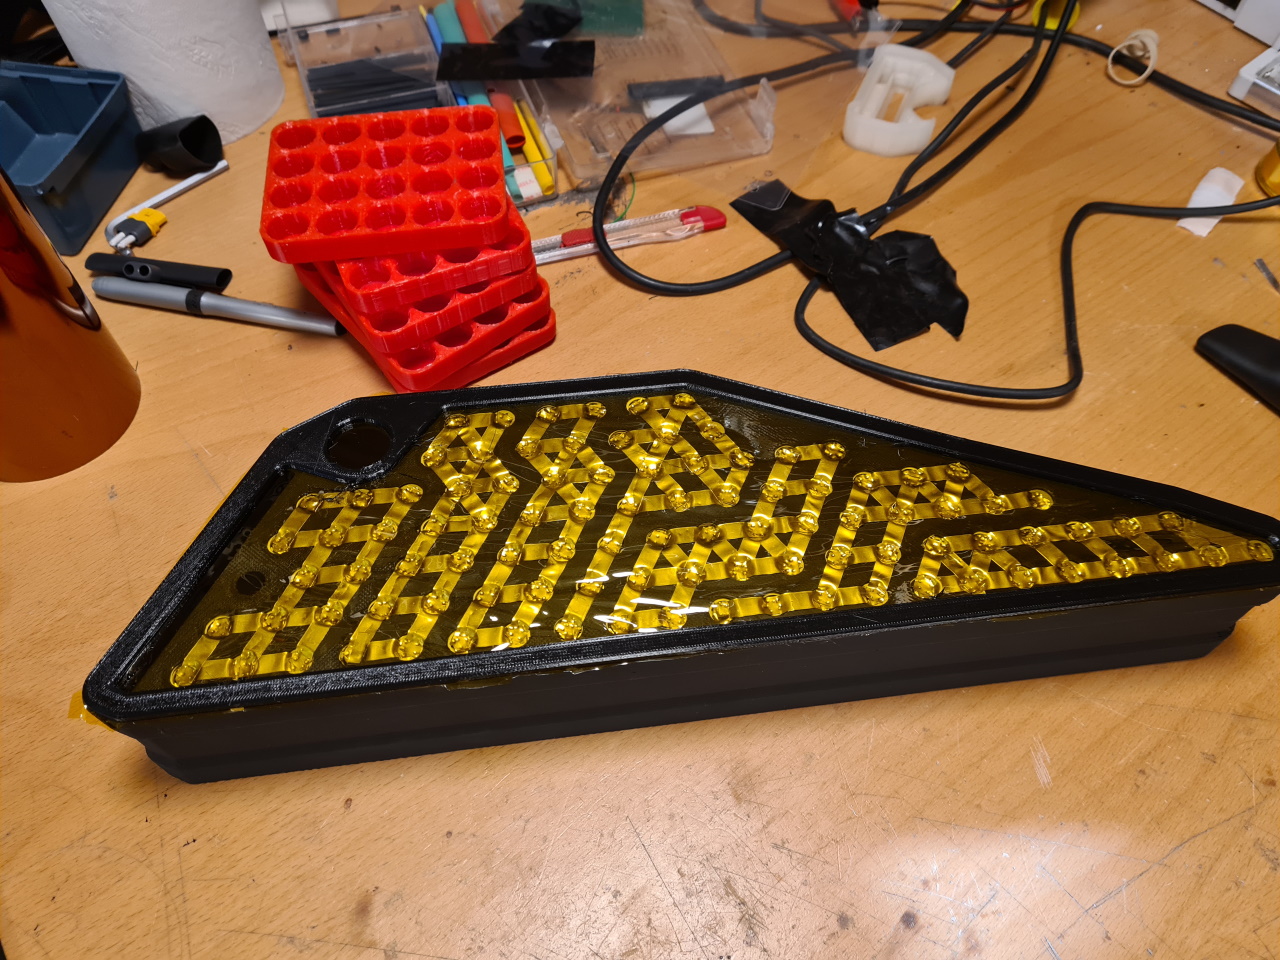
“Rubber” gaskets are designed and finally..

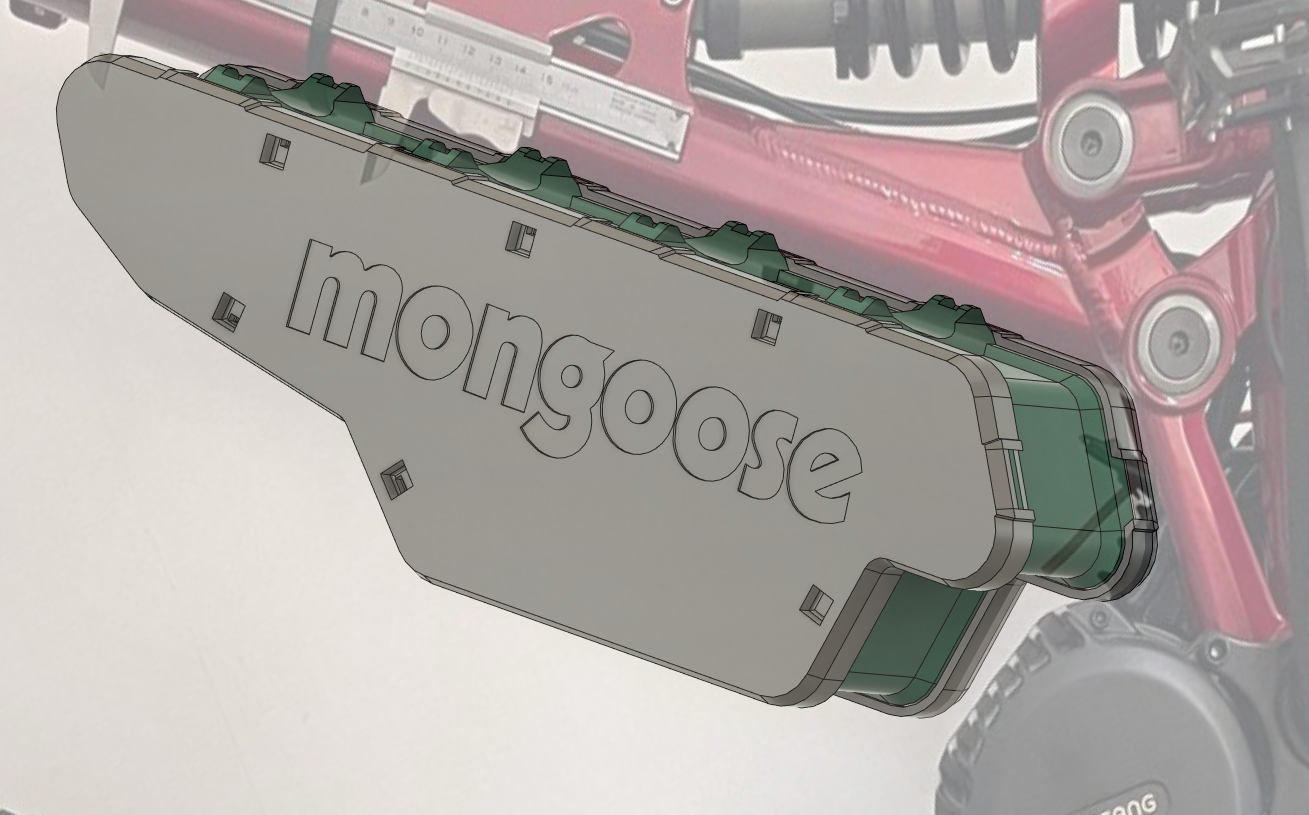
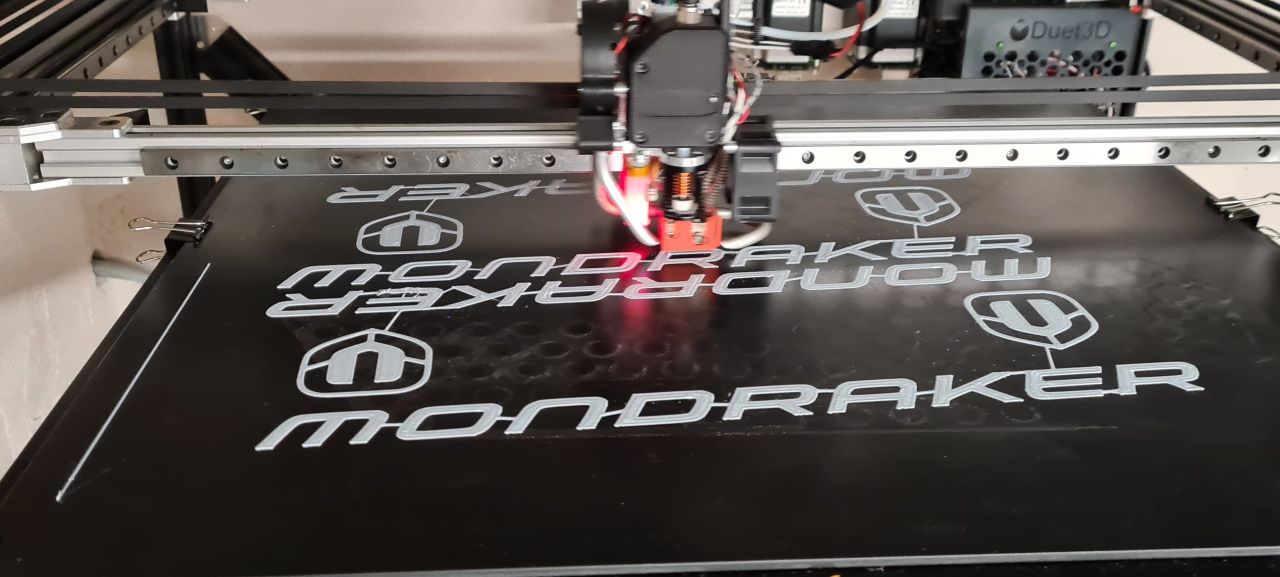
.. the outher shell, or sides, of the box is designed. Custom logo added on demand. 😉

After this it’s just a matter of letting the 3D-printer do its job which usually takes 40-60 hours for a box of this size.

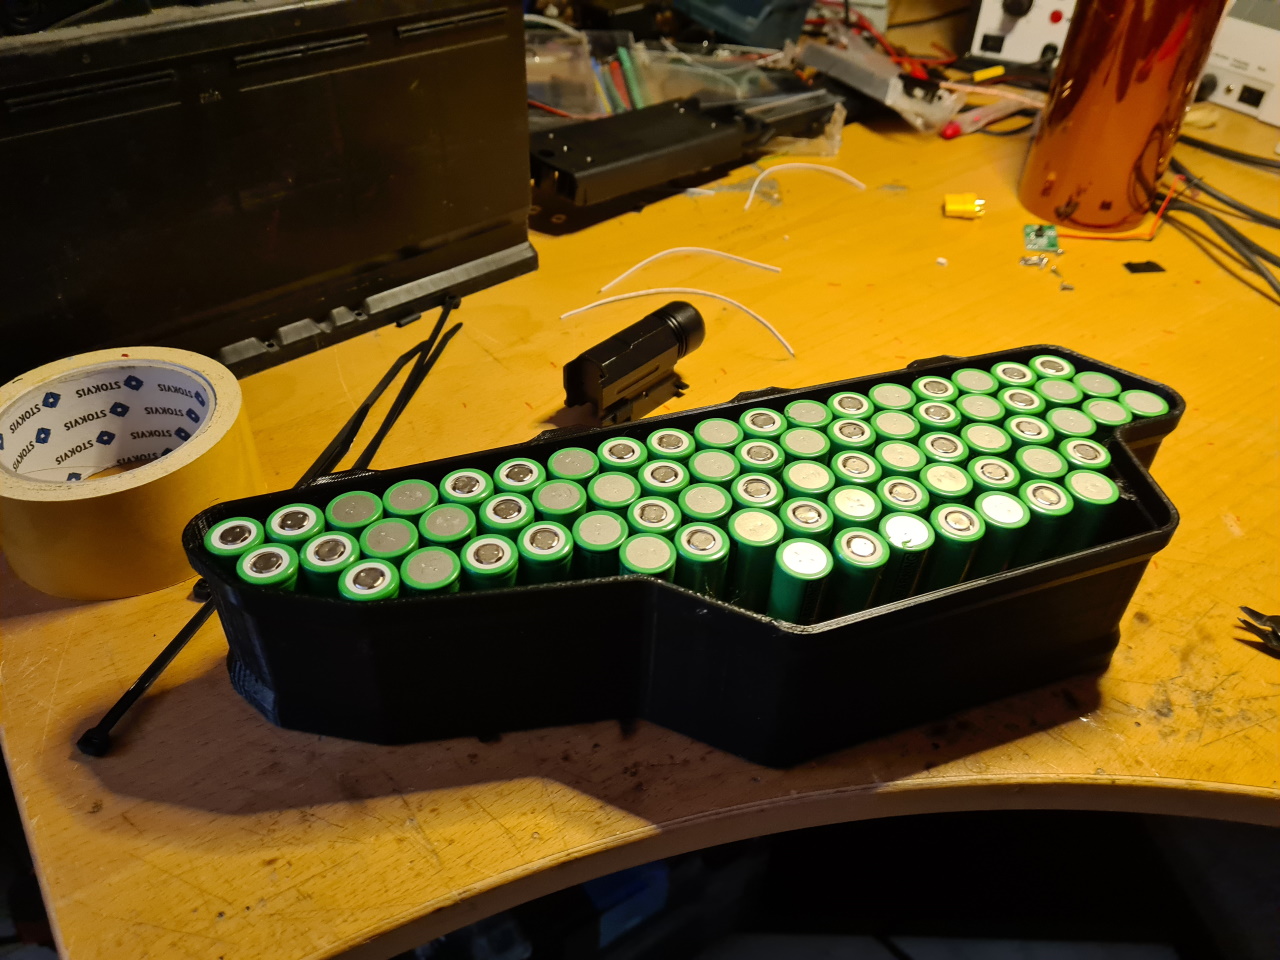
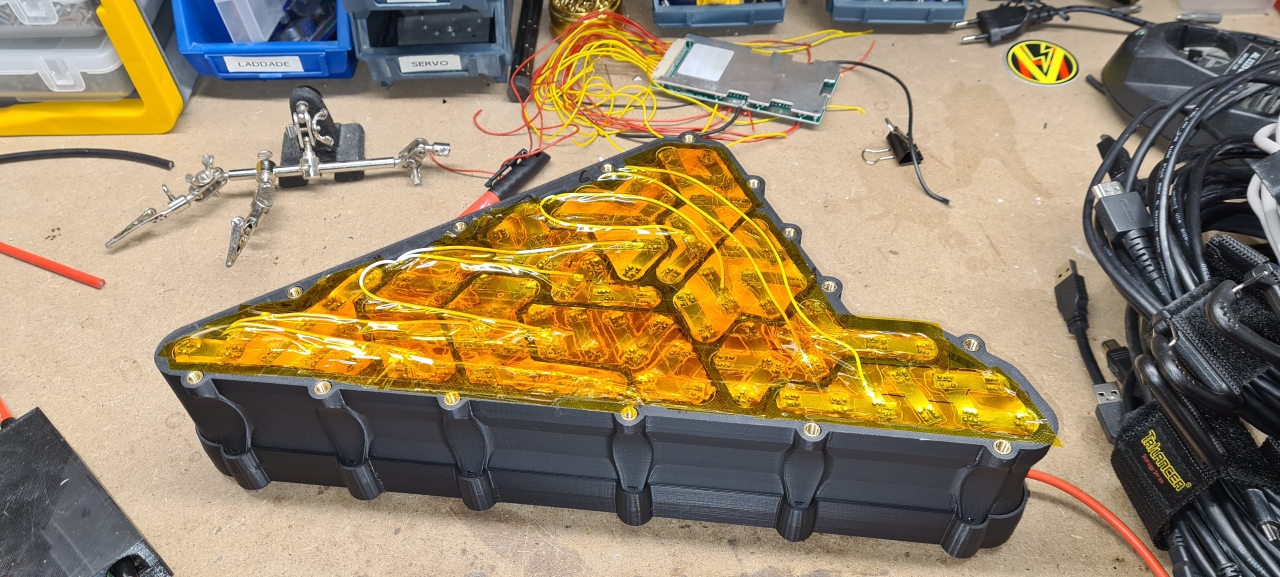
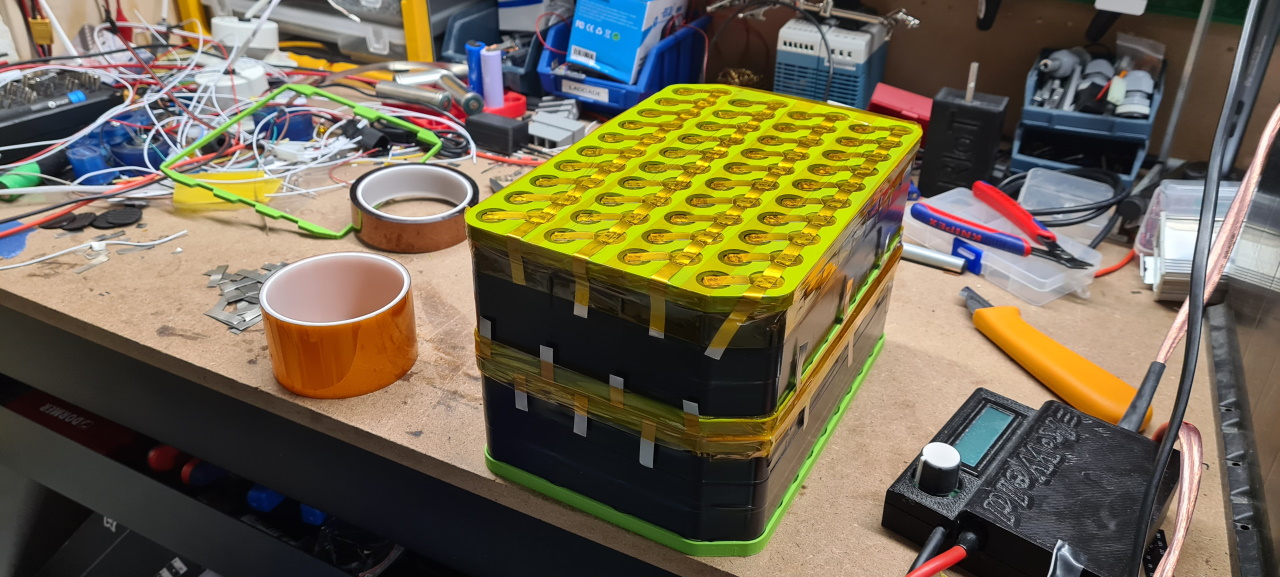
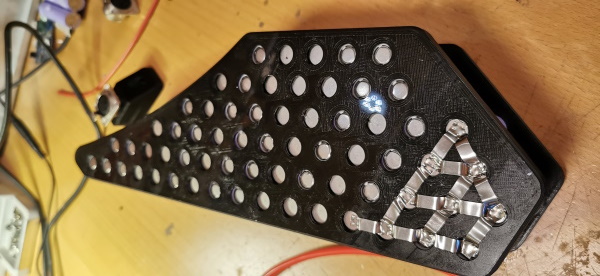
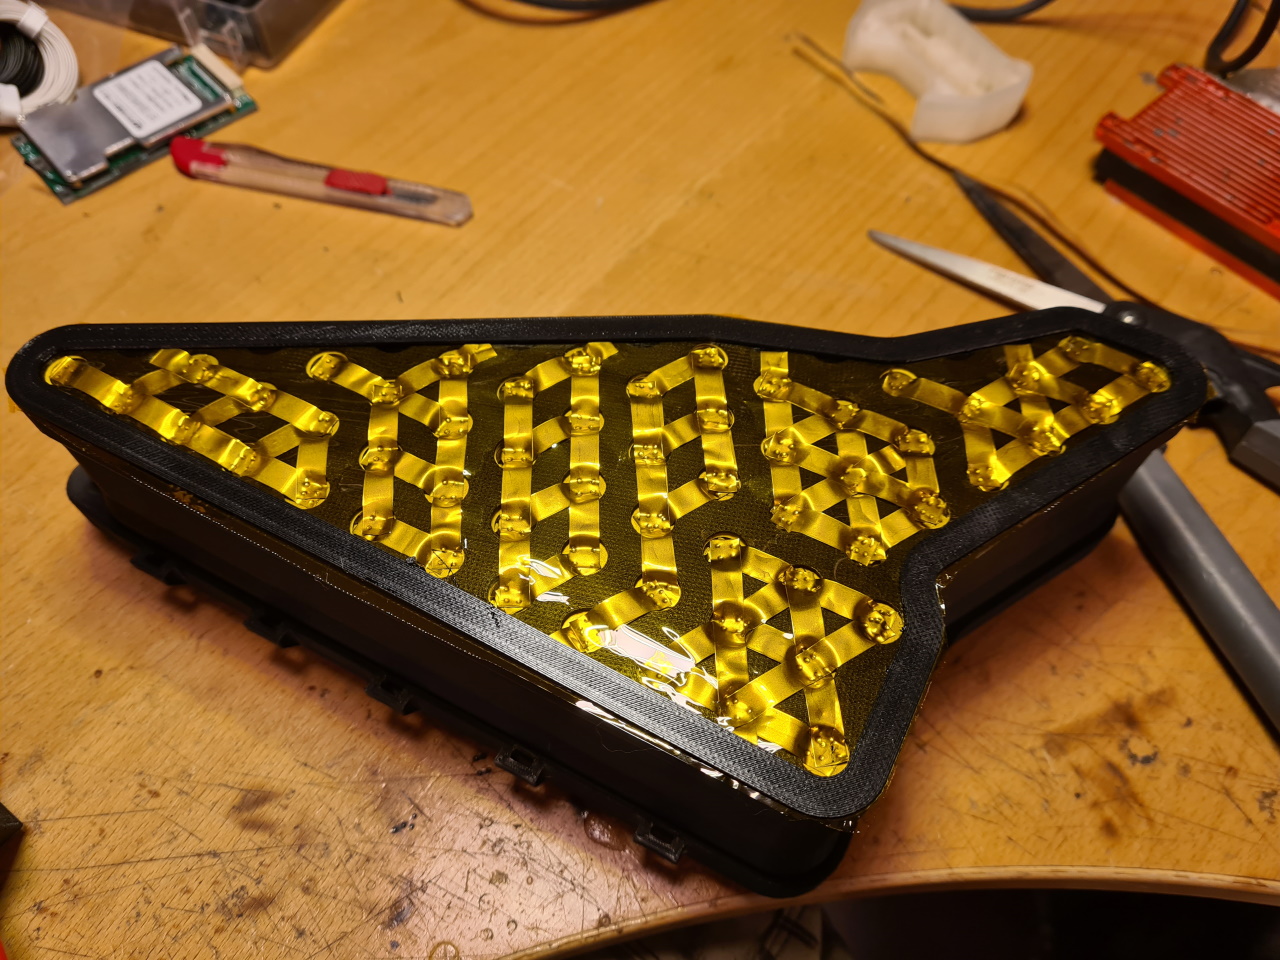
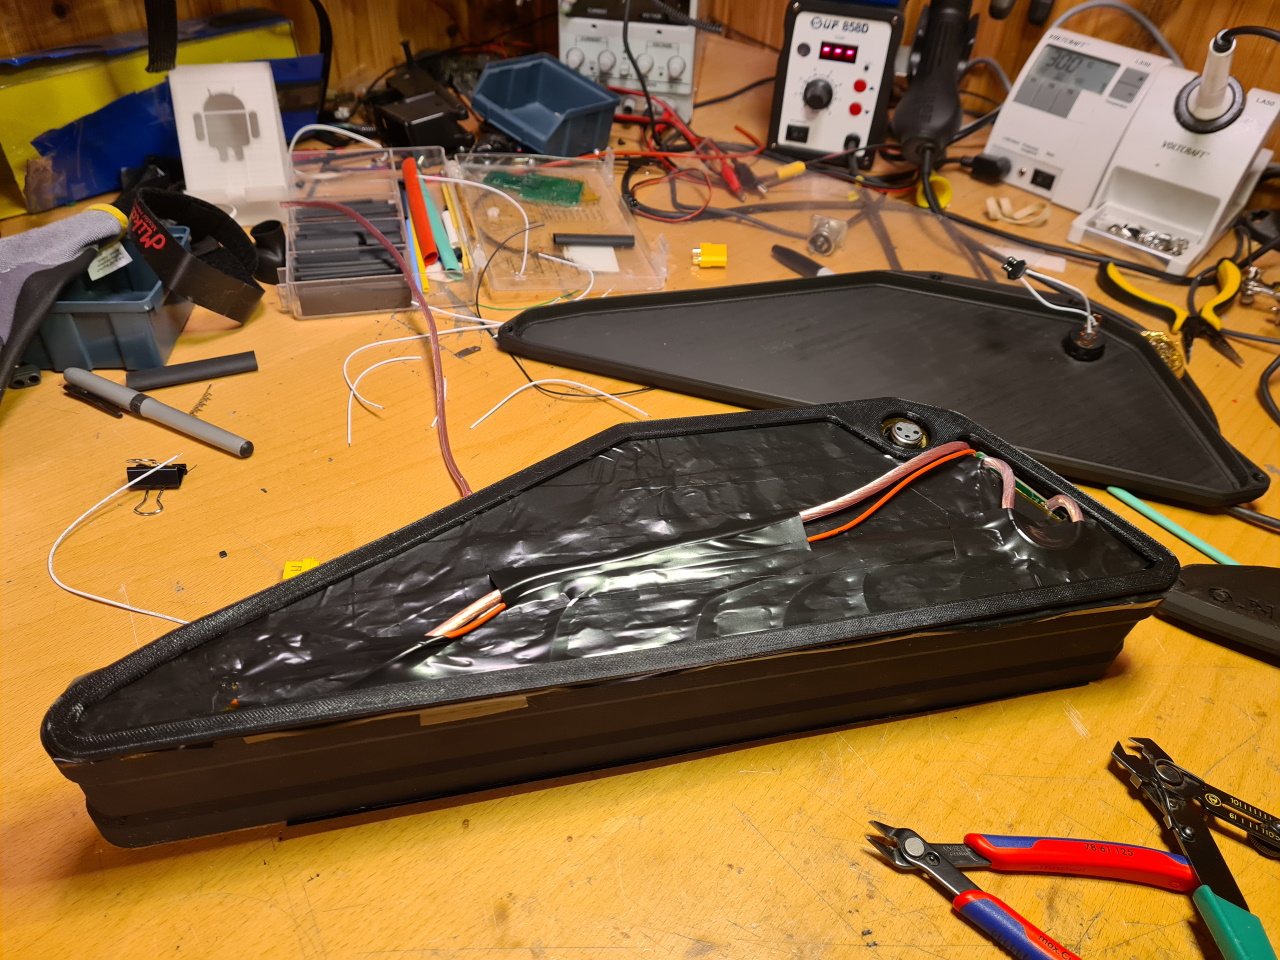
After the printing is done the cells are added to the cell frame, the joiner installed over the bundle and the second cell frame mounted on the other side. The cells are then welded taking super cautious care not to short anything out and then after the BMS has been added, the sides are bolted on and the pack ready to go on the bike.

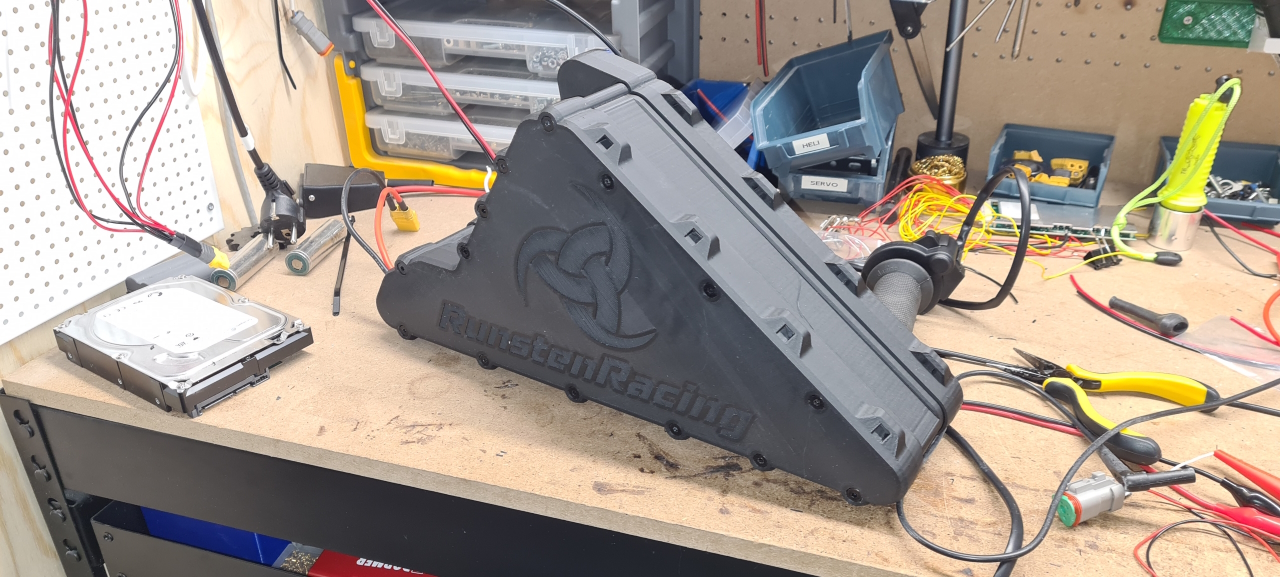
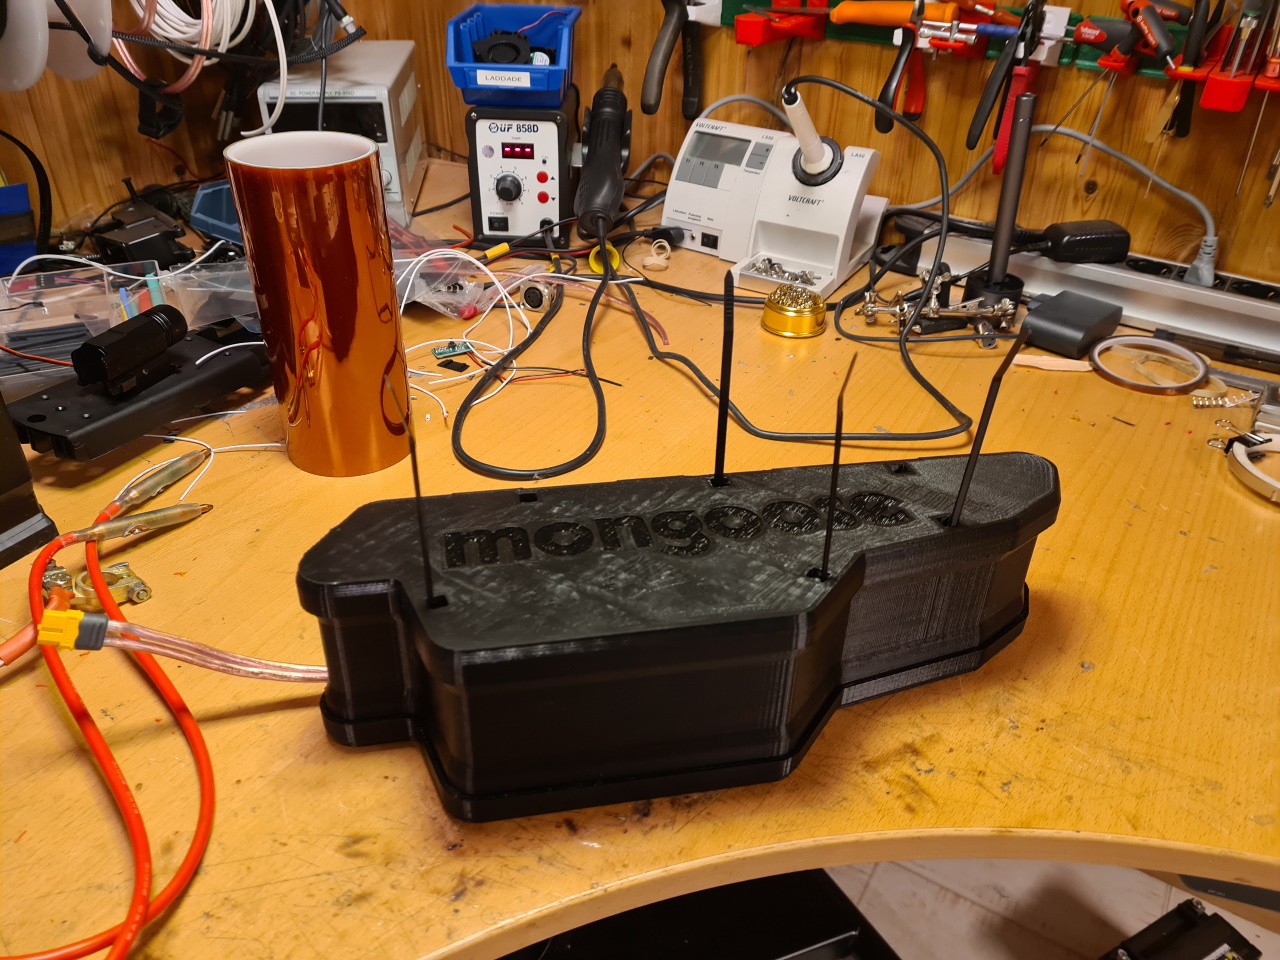
For this pack I tried using zipties instead of screws to hold the box together. It works fine but looks a bit wierd and after finding the threaded inserts that’s the way I’m building packs further on.

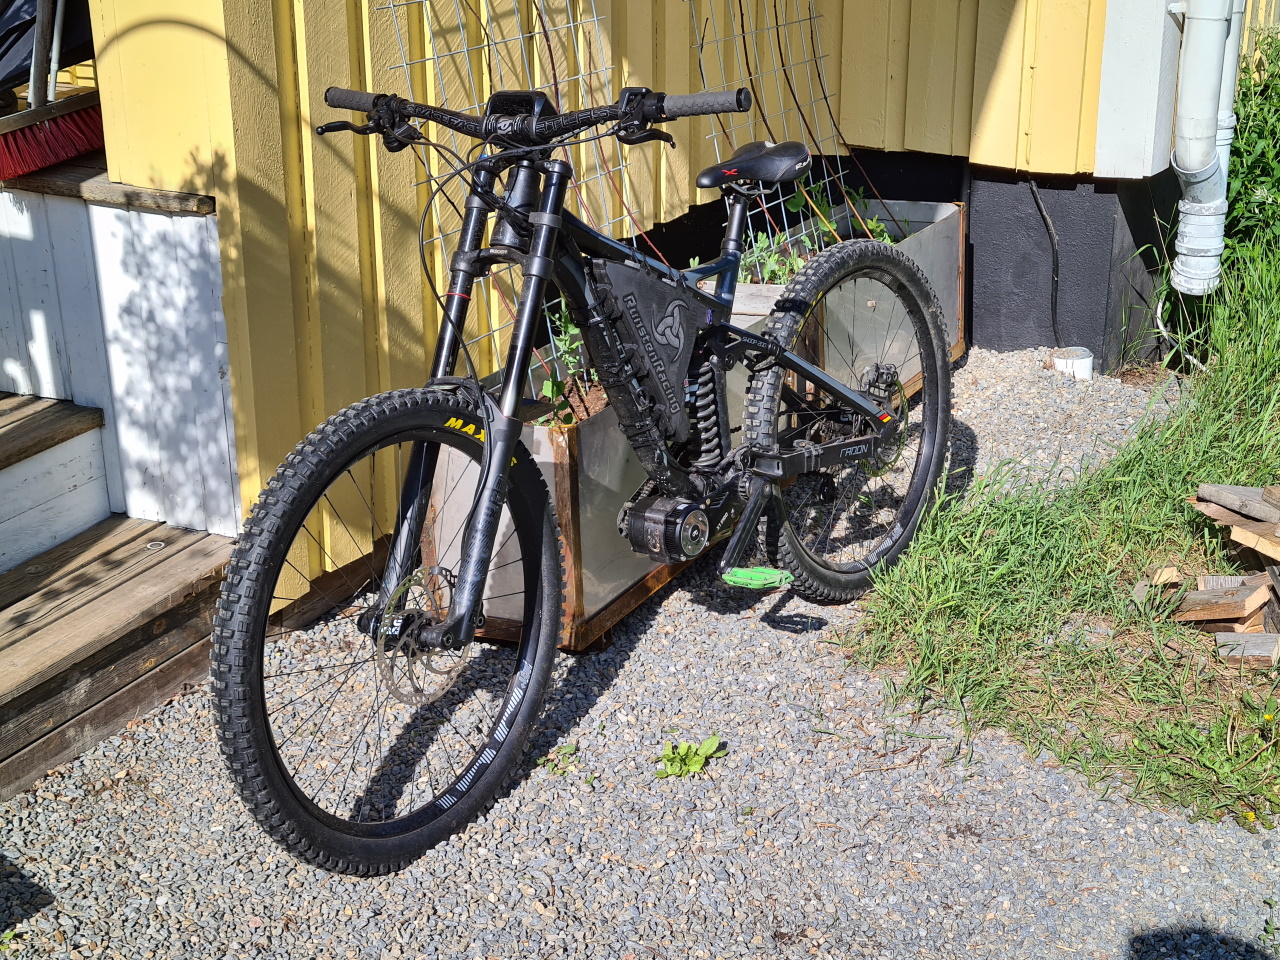
Unfortunately I do not have any pictures of this pack on the bike. Will try to get some the next time we ride together!

Well, more packs and builds to come. Please leave a comment if you appreciate the build posts, or send me a message on social media or discord.

Radon Swoop 200, custom battery build(s)

So, the first eBike I built for myself was a Canyon AM 8.0 which I first installed a BBS02 on and upgraded to the BBSHD after a month or so. Since my wife didn’t think I should make everything myself I bought a hailong battery with 13s5p LG-cells. It worked but the way I was riding the bike I could not find any method of getting the battery to stay on the frame. Eventually there was a combination of custom aluminium brackets, zipties and electrical tape which.. well, it wasn’t really my style.

Since I was 20kg heavier back then and the AM wasn’t really made for the kind of riding I did I eventually got an ok to upgrade to a used Radon Swoop 200 I found online.
Since the shape of the swoop frame doesn’t allow for a standard battery and since I wanted as much capacity I could possibly fit in the frame..

RunstenRacing battery version 1.0
Amazingly I fit 98 cells into the frame making this a 14s7p battery with a huge capacity of 24.5 Ah and almost 1.3kWh.

This frame however did not allow for mounting the BBSHD in any good way so it was pointing straight down. With 200mm of travel there’s not much room under the chainwheel when fully compressing the suspension on landing. After having been thrown a couple of times over the handlebars due to the motor hitting the ground I eventually “upgraded” to the CYC X1 pro. The style of mounting of this motor is much better suited to my style of frame.

Well, the CYC with the BAC855 can handle 72v..

RunstenRacing battery version 2.0

I really don’t know how, but I found room for 2 more cells rendering this a 20s5p battery. Since the 50A cont output of the MJ1 in a 5p configuration is not enough for the BAC855 I upgraded to SonyMurata cells capable of 35A each giving a total of 175A continuous power output – which is INSANE. The downside is that the Sony cells only had 2600mAh capacity, so this battery was a 72V battery with 13Ah capacity, or almost 0,95kWh. A lot less than the LG cells would have given but you can’t have a battery that’s not up to the job!

Well, since I wanted a lot of power output I bought a DALY BMS, 100A and 20s. That’s the red thing mounted under the frame. It was too big to fit inside the battery in any good way. This was a bit awkward but it worked, for a while..

One day the bike just wouldn’t turn on. Turned out the BMS was fried for some odd reason! Well, now I had no way of balancing the battery cells so..

RunstenRacing battery version 3.0

New design, new detachable mounting system with the same 20s5p layout using Molicel cells with the same 35A output and 2600mAh capacity as before. This time I bought a cheap BMS that fit inside the battery. Since the maximum output of that BMS is 30-ish amps I simply didn’t route the power cables through the BMS, so it’s just for carging and balancing the cells. Works flawlessly.

I really like the new design too but the mounting system is just too much trouble to be worth it. I won’t make another battery using that.
The idea was to have a battery that was easy to remove so we could build extra batteries to charge while we were riding so we could simply swap batteries when empty and go on riding.. This is still an idea but this mounting solution isn’t good enough.

eBike battery builds

So, since there seems to be an international interest in the eBike batteries I’ve built for myself and friends I’ll post some pictures of batteries, cases and give a bit of insight as to how I’m designing the cases.

I’m thinking I’ll make one post for one or a couple of batteries. That way it’s easier for me to post something a little now and then, and it won’t be a massive boring post of all of the batteries and iterations I’ve built and taken apart. 😉

So, enjoy, or just skip to something else!

So – one of the first custom batteries I built was for my brother.

So, of course there has to be a logo on the case, but since we couldn’t figure out what to put there he got the standard.. 😉

This is a 52V 14s7p battery with LG MJ1 cells making it a whooping 24,5Ah and almost 1,3kWh – which is insane for an eBike!

As you can see there’s the cell frames into which the MJ1 cells are mounted and welded. On top of that there’s kapton tape to protect the connections from shorting out. Then there’s a frame – a Joiner I call it since it joins the two cell frames together. On top of that there’s a TPU gasket to make the battery a bit more waterproof, and then there’s the top piece.

After adding the balance leads I used proper electrical tape to further insulate and protect the cells – something I’m not doing anymore since it makes the size of the battery too hard to predict. Also adding more kapton gives a better protection and a neater size.

The battery mounted in the frame of his Radon bike, propelled by a BBSHD motor. At 70A continous power output this battery is pretty oversized for the application but it gives a good range.